


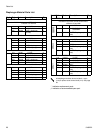
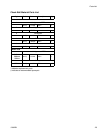

Service
310622L 23
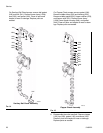
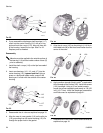
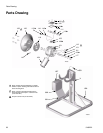
4. Grease the length of the diaphragm shaft (121), and
slide it through the housing (101).
5. Assemble the other diaphragm assembly to the
shaft as explained in step 2.
6. Non 3A approved diaphragms: Using a 5/8 in.
wrench hold the wrench flats of one diaphragm
assembly and torque the other diaphragm to 60-70
ft-lb (81-94 N
•m).
3A approved diaphragms: Grip both diaphragms
securely around the outer edge and handtighten.
7. Align the fluid covers (234) and the center housing.
Secure the covers with the clamps (135) and hand
tighten.
8. Reassemble the ball check valves and manifolds as
explained on page 19.
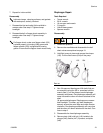
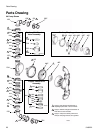
Bearing and Air Gasket Removal
Tools Required
• Torque wrench
• 10 mm socket wrench
• Bearing puller
• O-ring pick
• Press, or block and mallet
Disassembly
1. Relieve the pressure.
2. Remove the manifolds and disassemble the ball
check valves as explained on page 19.
3. Remove the fluid covers and diaphragm assemblies
as explained on page 21.
4. Disassemble the air valve as explained on page 16.
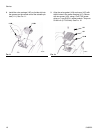
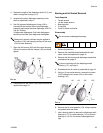
5. Using a 10 mm socket wrench, remove the screws
(122) holding the air covers (120) to the center
housing (101).
6. Remove the air cover gaskets (119). Always replace
the gaskets with new ones.
7. Use a bearing puller to remove the diaphragm shaft
bearings (117), air valve bearings (112) or pilot pin
bearings (113). Do not remove undamaged bear-
ings
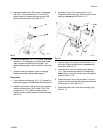
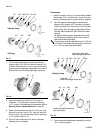
Waterproof, sanitary lubricant may be applied to
the clamp (135) and clamping surface of the cover
(234) to ease assembly.
F
IG. 20
135
234
TI8771a
Do not remove undamaged bearings.
If you are removing only the diaphragm shaft
bearing (117), skip step 4.
F
IG. 21
TI4733a
119 120 122101