


- 20 -
Discoloured Water
• Water rich in iron or other minerals can produce red or
brown staining. Heating water generally worsens this
situation.
• Black water can be an indication of organic contami-
nates in the water supply. This can be problematic in
areas where the water is obtained from surface or con-
taminated sources. Organic particles can develop bac-
terial growth, causing potential health hazards.
• Contact your water supplier for proper filtration or water
conditioning equipment.
• For bacterial problems contact your local health author-
ity. See also “Hot Water Odour”.
• A sudden appearance of rust-coloured water may indi-
cate that the anode(s) has been depleted. Once deplet-
ed, the anode’s inner steel core becomes exposed
causing it to corrode and release iron particles into the
water. See also “Anode Maintenance”.
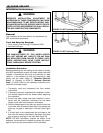
Anode Maintenance
A new anode is about 20mm (13/16 in.) to 22mm (7/8 in.)
diameter and has a steel wire core approximately 3mm (1/8
in.) diameter in the center. The anode should be replaced
when this wire is visible. Operating a water heater without
an actively working anode(s) will void the warranty.
To check/replace the anode:
1. Turn "OFF" the electrical supply to the water heater.
2. Close the cold water supply valve.
3. Open a nearby hot water faucet served by the system
to depressurize the system.
4. Connect a hose to the drain valve and drain 22 litres (6
USG.) as directed in “Draining, Flushing and Sediment
Removal”.
CAUTION! The water being drained can be extremely
hot! The drain hose should be rated for at least 94°C
(200°F). If the drain hose does not have this rating, open the
cold water supply valve and a nearby hot water faucet
served by the system until the water flow is no longer hot.
Close the cold water supply valve and resume.
5. Using a 1 5/16" socket, remove the anode(s) and inspect
it. The surface may be rough, full of pits and crevices, but
this is normal. If it is less than approximately 10mm (3/8
in.) in diameter, or the inner steel core exposed, the
anode(s) should be replaced.
NOTE: The anode(s) has been factory installed using a
power tool. It may be necessary for a second person to sta-
bilize the heater. A few sharp blows on the handle of the
socket wrench should loosen the anode nut. If an impact
wrench (power drive) is available, this is an easier way to
remove an anode.
6. Apply Teflon
®
tape or sealing compounds approved for
use with potable water to the threads of the anode(s)
and install into the tank top.
7. Open the cold water supply valve and open a nearby hot
water faucet to purge air from the water tank as directed
in “Filling the Water Heater”.
8. Check for leaks, repair as required, and re-test.
9. Turn the electrical supply to the heater “ON”.
Lime Scale
Over time all immersion type elements accumulate lime
scale on their surfaces. Various conditions affecting this
buildup include:
• Volume of hot water used; as the consumption of hot
water increases, more scale results.
• Water temperature; the hotter the water the more scale
is deposited.
• Purity of the water supply.
If it becomes necessary to delime the elements, use a non-
metallic (soft) tool or scraper to remove the scale taking
care not to damage the surface of the element. Alternatively,
use a non-muriatic delimer that is approved for use with
potable water to dissolve the lime scale.
DANGER! Do not use muriatic or hydrochloric acid based
deliming solutions.
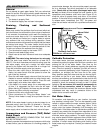
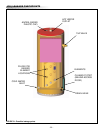
Troubleshooting Checklist
Before placing a service call, perform the following checks
to see if the problem can be identified and corrected easily.
Correcting a fault identified by this list may eliminate the
need for a service call and quickly restore hot water service.
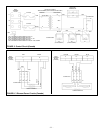
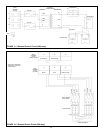
Refer to Figure 1 to identify the location of all of the heater’s
major components.
DANGER! BE SURE TO TURN OFF THE POWER TO
THE HEATER WHEN CHECKING EQUIPMENT.
Insufficient or no hot water:
1. Ensure the electrical supply to the water heater is in the
"ON" position.
2. Check that all the fuses are intact;
• Fuses are usually contained in the electrical disconnect
switch.
• There are also fuses in the heater control panel.
3. If the water is now cold but was excessively hot, the
high-limit switch may have tripped.
• To reset, open the component panel cover, remove the
insulation plug to access the high-limit switch. Depress
the red button to manually reset the switch.
NOTE: If the high-limit switch trips repeatedly the water
heater should be inspected by a qualified service techni-
cian.
4. A large demand for hot water may have been more than
the heater can supply.
• Allow a recovery period to restore water temperature
after large demands.
5. Check incoming water supply temperature.
• If the incoming water temperature is cooler than normal,
it will lengthen the time required to heat water to the
desired temperature
6. Look for leakage in the hot water supply lines.
7. Operation of the water heater may be affected by the
buildup of sediment or lime scale.
• Follow the instructions given in “Draining, Flushing and
Sediment Removal”.