


12 308655J
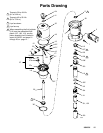
Air Motor and Throat Service
12. Grease and reinstall the seal (2*) with the lips
down, thread the throat bearing (36) into the air
motor base (28), and torque the throat bearing to
30 to 40 ft-lb (41 to 54 N.m) using a 1 5/8-in.
socket.
13. Slide the piston rod (29) down through the pack-
ing, and lower the piston assembly (27) into the air
motor base (28).
14. Carefully lower the cylinder (30) straight down onto
the piston assembly (27). Tighten the eight screws
(3) that hold the cylinder to the base (28).
CAUTION
To avoid damaging the cylinder wall, lower the
cylinder straight down onto the piston. Do not tilt
the cylinder while you lower it.
15. Grip the trip rod (31) with padded pliers, screw the
lift ring (24) onto the trip rod, push the lift ring
down, and screw it into the top of the cylinder.
16. Install the seal (107*) with the lips up, and place
the seal retainer washer (113) on the piston/valve
seat (109). Make sure the lips of the seal face up.
See Fig. 3.
17. Place the piston ball (103) in the displacement
rod (29).
18. Clean the threads of the piston/valve seat (109),
Apply Loctiter to the threads, and thread the
assembly from Step 16 onto the displacement
rod (29).
19. Clamp the flats of the piston/valve seat (109) in a
vise, and torque the displacement rod (29) to the
piston valve seat to 45 to 55 ft-lb (61 to 75 N.m).
20. Clamp the air motor base (28) in a vise horizontally
by closing the vise jaws on the flange
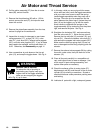
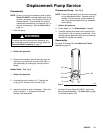
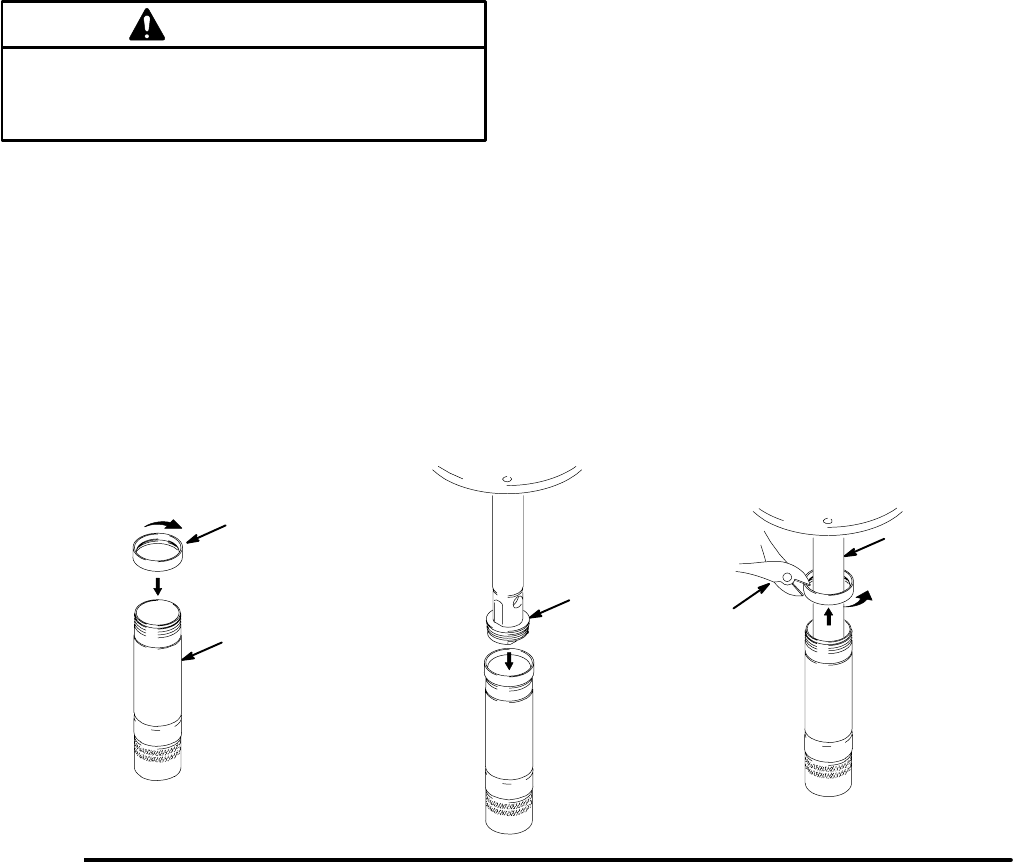
21. Thread piston assembly tool (A) (included in repair
kit 238751) onto the threads of the displacement
pump cylinder (110). See Fig. 5.
22. Insert the piston assembly (B) into the displace-
ment pump cylinder.
23. Unscrew the piston assembly tool from the dis-
placement pump cylinder. Clip the piston assem-
bly tool with a diagonal cutter (C), and discard it.
NOTE: Be careful that you do not scratch the rod.
24. Use a strap wrench to screw the displacement
pump cylinder (110) to the air motor base (28).
See Fig. 3.
25. Before you remount the pump, connect an air hose
and run the air motor slowly, starting with just
enough air pressure to make the air motor run, and
make sure that it operates smoothly.
26. Reconnect the ground wire before regular opera-
tion of the pump.
Fig. 5
110
7221A
A
rod
B
C