


10 308655J
Air Motor and Throat Service
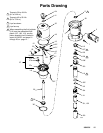
10. Pull the piston assembly (27) from the air motor
base (28), and set it aside.
11. Remove the throat bearing (36) with a 1 5/8-in.
socket, remove the seal (2*), and wipe the seat
clean with a cloth.
12. Remove the piston/base assembly from the vise,
and set it upright on the workbench.
13. Inspect the air motor for damaged or worn lower
valve grommets (17*), o-rings (19*, 20*), valve
nuts (21*), lock wires (22*), exhaust valve poppets
(26*), and inlet valve poppets (32*). If any of these
parts need to be replaced, continue with steps 14
to 20. Otherwise, see Reassembly on page 11.
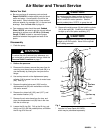
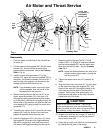
14. Use a screwdriver to push down on the trip rod
yoke (13), and snap the toggles down. See Fig. 4.
MOVING PARTS HAZARD
To reduce the risk of pinching or
amputating your fingers, keep your
fingers clear of the toggle assemblies
when you are snapping the toggles
(M in Fig. 4 ) up or down.
WARNING
15. In this step, while you are prying with the screw-
driver with one hand, cover the toggle assemblies
with your other hand so as to catch the spring-
loaded toggle assemblies when they snap out of
the lugs. Place the tip of a screwdriver into the
piston between the piston lugs (L) below the pivot
pins (16) on the toggles, pry up with the screw-
driver handle to compress the springs on the
toggle assembly (M) up and away from the piston
lugs, and remove the parts. See Fig. 4.
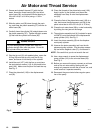
16. Straighten the lockwires (22*), and remove them
from the valve nuts (21*). Screw the top nuts off.
Remove the trip rod yoke (13), actuator (12), and
trip rod (31). Unscrew the bottom valve nuts (21*),
and remove the poppets inlet valve poppets (32*).
Make sure the valve bar spring clips (14) are not
worn or damaged and that they properly guide the
actuator.
17. Remove the exhaust valve poppets (26) by cutting
them with a side cutter, then pull them out of the
actuator (12).
18. Clean all the parts carefully in a compatible sol-
vent, and inspect them for wear or damage. Use
all the repair kit parts during reassembly, and
replace other parts as necessary.
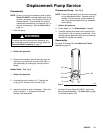
19. Check the surfaces of the air motor piston (27),
displacement rod (29), and the wall of the air motor
cylinder (30) for scoring or scratches. Scored or
scratched surfaces cause premature packing wear
and leaking.
20. Lubricate all parts with a light, waterproof grease.