


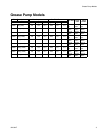


Operation
3A1334F 11
Install only one pump per delivery system. Do not use
the pumps in a parallel pump installation.
Loss of pump prime can occur if all the following events
occur in sequence:
1. A thermal relief event occurs.
2. The air supply valve is closed.
3. A dispense valve located at an elevation higher than
the tank level, is open.
To prevent loss of prime, ensure the air supply valve is
turned on before attempting to dispense fluid.
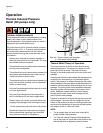
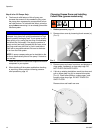
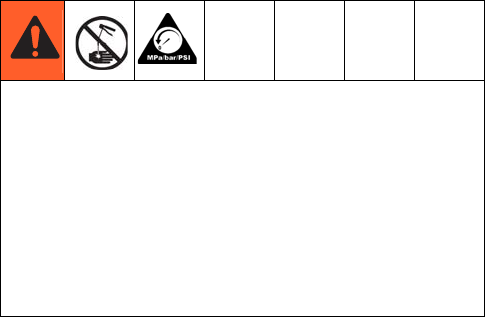
Pressure Relief Procedure
1. Close the pump’s bleed-type master air valve.
2. Close the pump air regulator and disconnect the air
supply hose.
3. Open the dispensing valve and dispense fluid into a
waste bucket/container until pressure is fully
relieved.
If you suspect that the dispensing valve is clogged, or
that pressure has not been fully relieved after following
the steps above, very slowly loosen the dispensing
valve coupler or hose end coupling to relieve pressure
gradually, then loosen completely.
Start-up
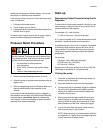
Determining Output Pressure Using the Air
Regulator
To determine the fluid output pressure using the air reg-
ulator reading, multiply the ratio of the pump by the air
pressure shown on the regulator.
For example a 3:1 ratio oil pump:
3:1 ratio x 100 psi air = 300 psi fluid outlet
A 3:1 pump is capable of 5:1 on the downstroke and will
develop 5:1 pressures under normal operation.
A grease pump has a ratio of 50:1. However it is capable
of reaching a stall pressure equal to 60 times the air
input pressure. To calculate the fluid output pressure
using the air regulator reading, multiply the regulator
gauge by 60.
For example:
140 psi air x 60 = 8400 psi fluid output
0.97 MPa air x 60 = 58.2 MPa
99.7 bar x 60 = 582 bar
Regulate air to the pump so that no air line or fluid line
component or accessory is over pressurized.
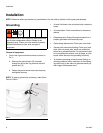
Priming the pump
1. Close the air regulators and bleed-type master air
valves to all but one pump.
2. Open the master air valve from the compressor.
3. For the pump that is connected, trigger the dispens-
ing valve into a grounded metal waste container
making firm, metal-to-metal contact between the
container and the valve.
4. Slowly open the bleed-type master air valve and
open the pump air regulator just until the pump is
running. When the pump is primed and all air has
been pushed out of the lines, release the trigger.
5. If you have more than one pump, repeat this pro-
cess for each pump in your system.
NOTE: When the pump is primed and has sufficient
air supplied to it, it starts when the dispensing valve
is open and shuts off when closed.
The equipment stays pressurized until pressure is
manually relieved. To reduce the risk of serious injury
from pressurized fluid, fluid from the valve, or splash-
ing fluid, follow this procedure whenever you:
• are instructed to relieve pressure
• stop dispensing
• check, clean, or service any system equip-
ment
• install or clean dispensing devices.