15308118
Service
Displacement Pump Service
Disassembly
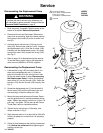
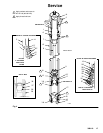
When disassembling the pump, lay out all removed
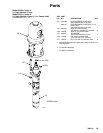
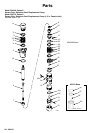
parts in sequence to ease reassembly. See Fig. 4.
NOTES
D Standard Repair Kit 224403 (UHMWPE/PTFE
packings) is available. For the best results, use all
the new parts in the kit. Parts included in the kit are
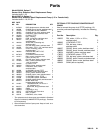
denoted with one asterisk, for example (2*).
D Conversion Kit 224889 is available to convert the
pump to all PTFE packings. See page 18.
D Clean all the parts thoroughly when disassembling.
Check them carefully for damage or wear, replacing
parts as needed.
1. Remove the displacement pump from the air motor
as explained on page 14.
2. Unscrew the locking ring (20) from the cylinder
(15). See Fig. 4. Remove the intake valve housing
(21).
3. Remove the o-ring (19), ball stop pin (17), and ball
(18) from the intake valve housing (21).
4. Unscrew the cylinder (15) from the outlet housing
(5), note its orientation and carefully pull the cylin-
der off the pump. Remove the o-ring (6) from the
outlet housing.
NOTE: It is important to replace the cylinder in the
same orientation as both ends are NOT alike.
Failure to install correctly may result in failure of
pump or premature seal wear. For instructions on
how to verify correct orientation, see NOTE in step
7 on page 16.
5. Loosen the packing nut (14), then pull the dis-
placement rod (1) and connecting rod (8) out the
bottom of the outlet housing (5).
6. Secure the flats of the displacement rod (1) in a
vise. Unscrew the coupling nut (7) from the dis-
placement rod. Remove the connecting rod (8) and
attached parts.
7. Place the flats of the piston mounting stud (13) in a
vise. Loosen the jam nut (9) and unscrew the
adapter (10) from the piston mounting stud (13).
Set the connecting rod (8) aside. Remove one
cotter pin (12) and the ball stop pin (11), taking not
which set of holes it is in. Then remove the ball
(16).
8. Unscrew the piston stud (27) from the piston
mounting stud (13). Remove the piston packings
(29, 30), glands (28, 31) , shims (35), and washer
(26).
9. Remove the packing nut (14), throat packings (3,
25), and glands (2, 4) from the outlet housing (5).
10. Inspect all parts for damage. Clean all parts and
threads with a compatible solvent before reassem-
bling. Inspect the polished outer surface of the
displacement rod (1) and inner surface of the
cylinder (15) for scratches, scoring, or other dam-
age, which can cause premature packing wear and
leaking. To check, run a finger over the surface or
hold the part up to the light at an angle. Be sure
the ball seats of the piston (27) and intake valve
housing (21) are not chipped or nicked. Replace
any worn or damaged parts.


