308200 13
Service
Reconnecting the Displacement Pump
WARNING
To reduce the risk of serious injury whenever you
are instructed to relieve pressure, always follow the
Pressure Relief Procedure on page 8.
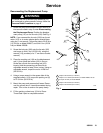
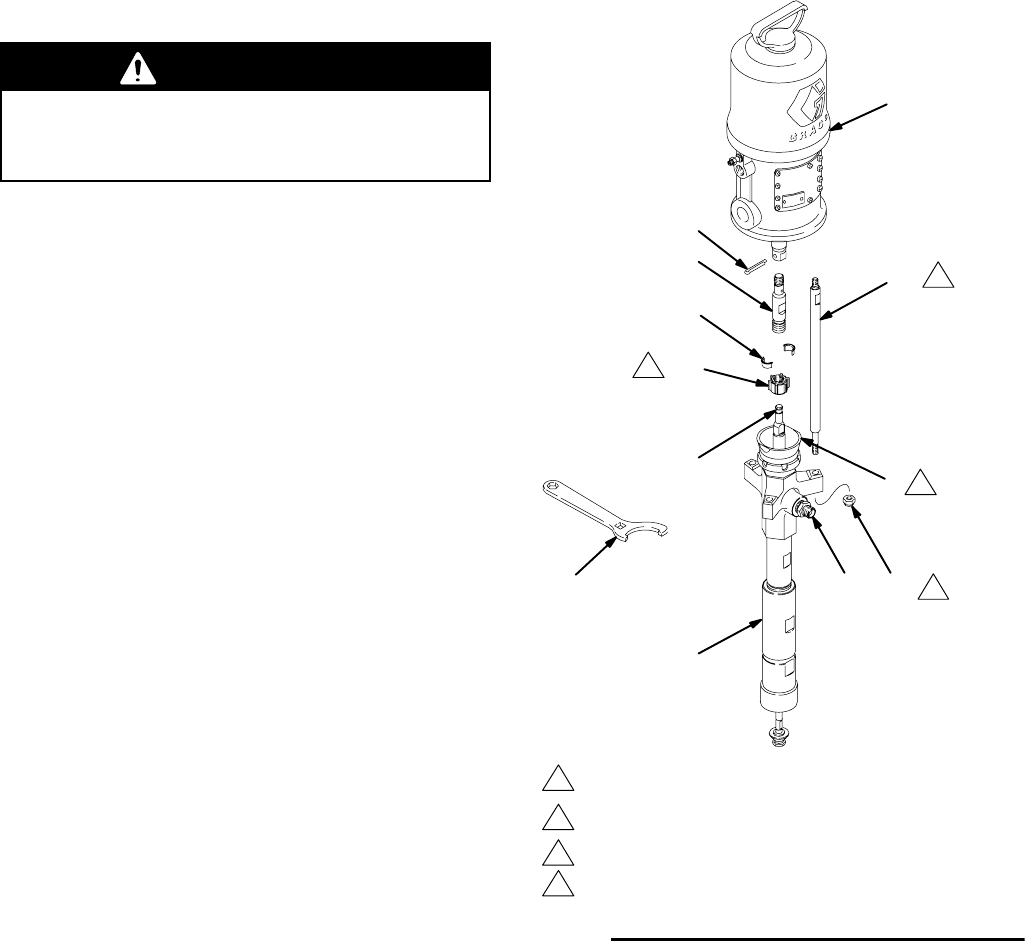
1. Orient the pump’s fluid outlet to the air motor’s air
inlet as was noted in step 3 under Disconnecting
the Displacement Pump. Position the displace-
ment pump (107) on the tie rods (102). See Fig. 4.
NOTE: If you removed the tie rods (102) from the air
motor (101) or air motor adapter plate, reinstall them
using an 11 mm wrench. Torque the rods to 20-25 N.m
(15-18 ft-lb) on Model 222907, and 34-41 N.m (25-30
ft-lb) on Model 222839.
2. Screw the locknuts (106) onto the tie rods (102)
and torque to 34-41 N.m (25-30 ft-lb), using the
wrench (113) provided (or a 17 mm box or socket
wrench).
3. Place the coupling nut (104) on the displacement
rod (1), then place the collars (105) in the nut.
Screw the nut onto the connecting rod (103)
loosely. Hold the connecting rod flats with an
adjustable wrench to keep it from turning. Using an
adjustable wrench, torque the nut to 41-48 N.m
(30-35 ft-lb).
4. Using a torque wrench in the square hole of the
supplied wrench (113), torque the packing nut (2)
to 27-34 N.m (20-25 ft-lb).
5. Mount the pump and reconnect all hoses. Recon-
nect the ground wire if it was disconnected during
repair. Turn on the air and run the pump slowly.
6. Fill the packing nut/wet-cup 1/3 full of Graco
Throat Seal Liquid or compatible solvent.
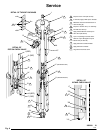
Fig. 4
01059
101
103
105
107
102
106
104
108
2
113
1
7
1
3
4
2
1
Torque to 30–35 ft–lb (41–48 NSm).
2
Torque to 15–18 ft–lb (20–25 NSm) on model 222907; 25–30
ft–lb (34–41 NSm) on model 222839.
3
Torque to 20–25 ft–lb (27–34 NSm).
4
Torque to 25–30 ft–lb (34–41 NSm).


