Repair
306642F 7
Repair
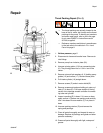
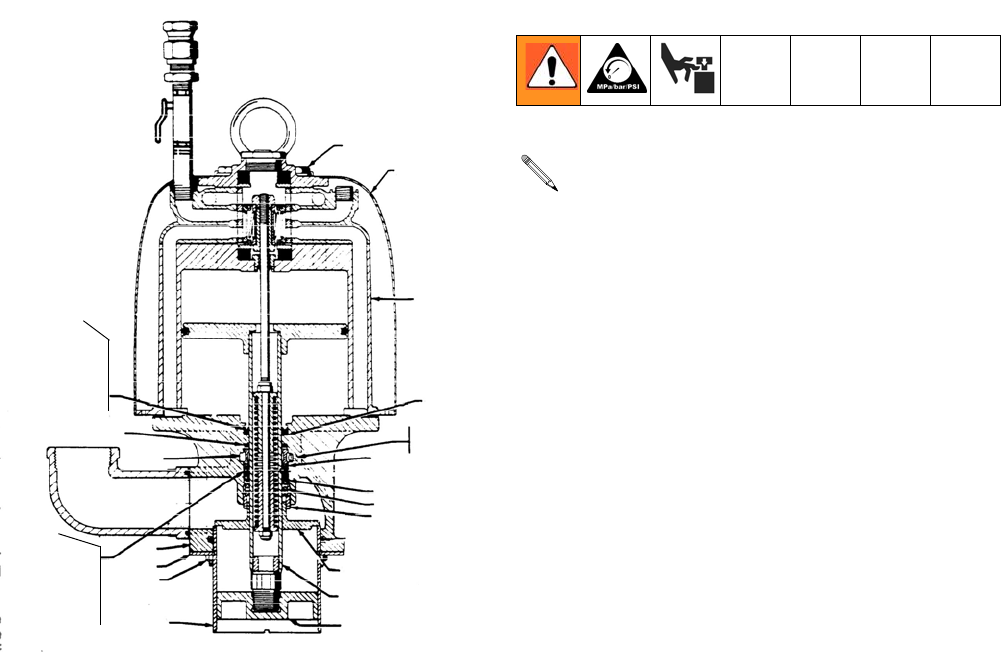
FIG. 4
Throat Packing Repair (FIG. 4)
1. Relieve pressure, page 5.
2. Disconnect air hose and transfer hose. Remove air
inlet fittings.
3. Remove pump from inductor plate (20).
4. Unscrew priming piston (13) from connecting tube
(A). The priming piston has a 1-3/4 in. hex in the
center.
5. Remove nuts and lock washers (4, 2) holding pump
guides (12) and collars (17). Remove these parts.
6. Pull intake cylinder (19) straight down.
7. Remove screws (P) and air motor shield (B).
8. Remove screws and washers holding air motor cyl-
inder (C) to base (D). Pull base straight off, being
careful not to damage smooth surfaces of connect-
ing tube and cylinder.
9. Inspect v-packing (E) in base. If it is worn or dam-
aged, remove it. Grease new packing and carefully
tuck it into base. Be sure washer (F) is in place in
base.
10. Unscrew packing retainer (G) and remove the
spring and packings.
11. Clean all parts thoroughly and inspect for wear or
damage. Replace all packings and glads and other
parts as necessary.
12. Grease all parts thoroughly with light, waterproof
grease.
P
B
C
F
Weep
Hole
K
M
N
G
14
A
13
19
4, 2
17
D
L
Lips of
V-Packings
Must Face
Down
J
H
E
Lips of
V-Packing
Must Face
Up
• The throat packings are actually located in the
base of the air motor, but function as the throat
packings for the pump. To identify part numbers
and order repair parts, refer to parts list page
for air motor 208357 in instruction manual
307049, supplied.
• Reference numbers and letters in parentheses
in the text refer to the callouts in F
IG. 4 and
Parts List page 9.


