


8
38
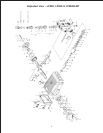
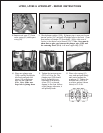
8. Remove seal case (37) from
valve casing (43) and inspect
o-ring (38).
9. Check plunger surface (29B). If plunger pipe is worn out, loosen
tension screws (29C) and pull off plunger pipe to the front. Clean
front surface of plunger (25) thoroughly. Apply a thin coat of
Loctite to the tension screw threads (29C). Note: Care must be
taken that no glue gets between the plunger pipe (29B) and
the centering sleeve (29A). Add new copper ring (29D).
29B 29D 29C
10. Place new plunger pipe
(29B) carefully through the
oiled seals and push seal
sleeve (35) with plunger
pipe into the crankcase
guide. Note: Make sure
weep hole is facing down.
11. Tighten the tension screws
(29C) to 310 in.-lbs. The
plunger pipe (29B) should
not be strained by over
tightening of the tension
screw (29C) or through
damage to the front surface
of the plunger; otherwise, it
will probably break.
12. Place valve vasing (43)
over studs and push firmly
until seated against the
crankcase (1). Tighten the
hexagon nuts (49A) in a
crosswise pattern (shown
below) to 59 ft.-lbs.
4
1
2
3
6
8
7
5
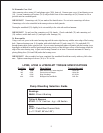
LP200, LP250 & LP250W-MT - REPAIR INSTRUCTIONS