


11
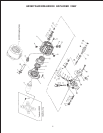
7. Tap the back of the manifold (28)
with a rubber mallet to dislodge,
and slide off the plungers (10).
Take note of the position of the
discharge port so as to place the
port in the same position during
reassembly.
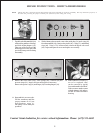
8. With a 19mm socket wrench, remove the guide plug (54) and o-ring (56)
from the manifold (28). Remove the piston (46), o-ring (47), and backup
rings (48). Using a 7/32" Allen wrench, remove the bypass valve seat
(66). Inspect the parts for wear and replace as necessary.
54 56 48 47 48 46 66
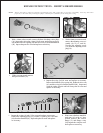
REPAIR INSTRUCTIONS - HR2527A/HR3025/HR3030
NOTE: Always take time to lubricate all metal and nonmetal parts with a light film of oil before reassembly. This step will ensure proper fit, at
the same time protecting the pump's nonmetal parts (elastomers) from cutting and scoring.
9. Remove the valve cones (19A), valve springs (18), v-sleeves (20) and
pressure rings (22). Inspect for wear and replace as necessary.
Remove the spacer ring (16) and flinger (56) from the plungers (10).
10. If the crankcase oil seals (15)
are to be replaced, they
can be removed by prying
loose with a small screwdriver.
Take care not to make contact
with the plunger (10) and pry
out the oil seals from their
housing.
74 16 22 20 18 19A
Contact Giant Industries for service school information. Phone: (419) 531-4600
11. Reassemble in reverse order.
Fill the crankcase until the
proper amount of oil (see
specifications page 3).
The pump is now ready for
operation.