


8
For Help, call 1-800-35-GENIE or visit www.geniecompany.com
A
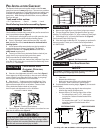
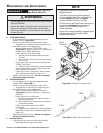
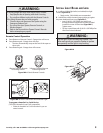
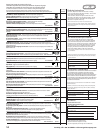
To program one Button of a Remote Control (Figure MA-4):
• Locate Learn Button and Learn Indicator Light
on left side of Power Head (Figure MA-5).
• Press and release Learn Button. Red Learn
Indicator Light will blink 2 times per second.
• Press Remote Control Button once within 30
seconds. Red Learn Indicator Light will stay lit.
• Press Remote Control Button again. Red Learn
Indicator Light will go out, indicating that
memory is stored.
B
Program each additional Remote using step A above
(up to seven).
NOTE
• Each Remote Control must be programmed
separately.
• The Remote Controls will not cause the door
Opener to close the garage door if the Safe-T-
Beam® System is malfunctioning.
• When programming the Remote Controls, they
must be at least 24” from the Antenna Wire.
• If the red Learn Indicator Light blinks
approximately 4 times per second,
programming has stopped. If programming
has stopped, repeat the above steps.
• Each Button on a 2 or 3 Button Remote Control
is for a different Opener. You cannot use more
than one Button per Remote, per Opener.
• A maximum of seven Remote Controls or
Wireless Keypads can be stored into the
Receiver at one time. If a Remote Control
becomes lost, or if you want to delete a Remote
Control or Wireless Keypad, see “To Erase All
Receiver Memory.”
C pR o G R a m m i n G t h e
Re m o t e Co n t R o l S
Programming 1:
aC C e S S o R i e S
To Erase All Remotes from Power Head Memory
A Press and hold Learn Button on Power Head for 10
seconds or until Learn Indicator Light goes out.
Memory is erased:
• Program Transmitter/Receiver again as needed.
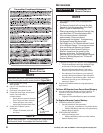
To Replace Remote Control Battery
A FOR NON-FLASHLIGHT MODELS
• Pop off the back of the transmitter.
–
Use coin, pen, screwdriver or any similar device.
–
Replace old Battery with new coin type battery.
• Replace back of remote.
B FOR FLASHLIGHT MODELS
• Slide open battery cover.
– Replace old Battery with new AAA battery.
• Replace battery cover.
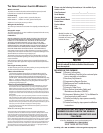
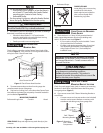
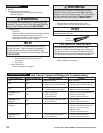
A Open garage door using
Wall Console.
B Lay a 2” x 4” board flat in center
of doorway.
C Close door using Wall Console.
D Check that door stops and reverses
within 2 seconds after it
contacts board:
•
If door does not reverse, decrease
Close Force until door reverses.
•
If door still does not reverse,
move Limit Switch toward door.
E Check Safe-T-Beam® System
operation:
•
If beam is blocked, door will
not close.
NOTE
The door must contact the 2” x 4” board before the Carriage activates
the Close Limit Switch. If not, readjust the Close Limit Switch.
Ch
S
e t t i n G Co n t a C t
R
e V e R S e fu n C t i o n
Adjustment 2:
NOTE
Limit Switch and Force Adjustments must be completed
before checking the contact reverse function (Figure MA-3).
2” x 4” board
laid flat
Figure MA-3
Transmitter Compliance Statement