


PN# 37026500123 02/26/2010 REV. 1
20
DOOR LIMITS
FOR HELP-1.800.354.3643 OR WWW.GENIECOMPANY.COM
6
The OPEN (UP) and CLOSE (DOWN) door positions
are controlled by making the adjustments on the
panel located on the bottom of the power head. The
adjustments that can be made are:
• Close Travel Limit,
• Open Travel Limit,
Adjust Closing Force
Adjust Opening Force
Transmitter Programming
SETTING & TESTING OPEN/CLOSE LIMITS
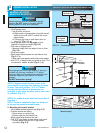
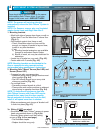
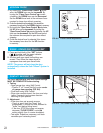
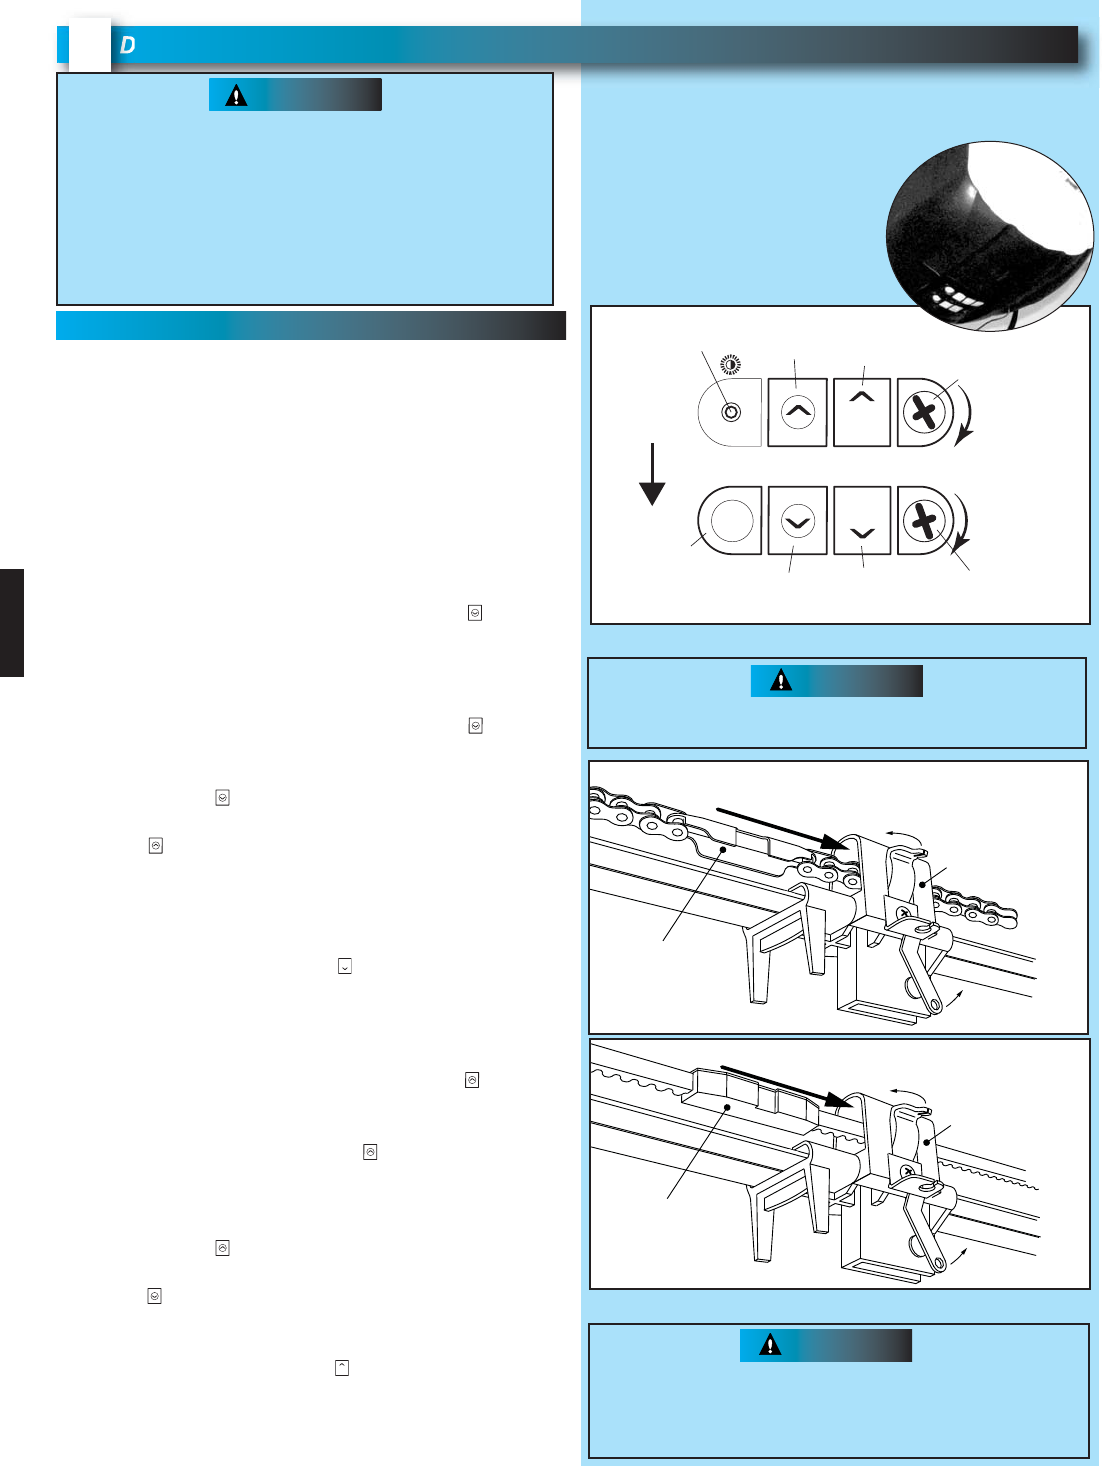
FIG. 6-1 Limit controls.
SET
SET
OPEN
FORCE
CLOSECODE
LEARN LIMITMANUAL
Open
Travel Limit
Open
Set Limit
Button
Close
Travel Limit
Close
Set Limit
Button
Down Force
Control
Adjustment
Up Force
Control
Adjustment
Learn
Code
Button
LED
Indicator Light
To
Garage Door
• Severe injury or death can result if the door
closing force is set too high.
• Never increase the door closing force above the
minimum required to move the door.
• Never adjust force to compensate for a sticking
or binding door.
• Perform monthly CONTACT REVERSE TEST as
described on page 22 and in Section 10.
WARNING
Limit Controls location
on power head.
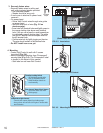
B) CLOSE TRAVEL LIMIT
1. Press and hold the "Close Travel Limit" button
until the door is fully closed.
2. You can quickly press and release the "Close
Travel Limit" button to move the door in small
increments. You can also use the "Open Travel
Limit" button to move the door slightly in the
UP direction.
3. Door is fully closed when the bottom edge of door
presses firmly onto the ground.
4. Once the door is in the desired position, press and
hold the "Close SET Limit" button for 5 seconds.
The LED indicator light will blink green once. This
stores the closed position in memory.
C) OPEN TRAVEL LIMIT
1. Press and hold the "Open Travel Limit" button
to move the door to its fully opened position. This
starts the opener moving in the UP direction.
2. Hold the "Open Travel Limit" button until the
door is in the fully opened position that you desire,
then release this button.
3. You can quickly press and release the "Open
Travel Limit" button to move the door in small
increments. You can also use the "Close Travel
Limit" button to move the door slightly in the
DOWN direction.
4. Once the door is in the desired position, press and
hold the "Open SET Limit" button for 5 seconds.
The LED indicator light will blink green twice. This
stores the opened position in memory.
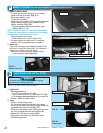
SET
SET
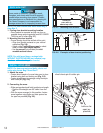
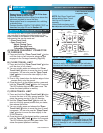
Carriage Assembly
Chain Connector
Latch
Movement
Latch
Movement
Move in this direction
Carriage Assembly
Belt Connector
Latch
Movement
Latch
Movement
M
ove in this direction
FIG. 6-2 Engage Chain/Belt Connector to Carriage.
Operation of the opener without the Chain or Belt
Connector engaged to the Carriage Assembly will
result in damage to rail components including the
rail pulley.
CAUTION
A) ENGAGE CHAIN/BELT CONNECTOR
TO CARRIAGE
1. Press and hold the "Close Travel Limit" button
until the chain or belt connector advances and
engages to the Carriage Assembly (Fig. 6-2).
Failure to verify the engagement of the belt/chain
connector will result in damage to rail components.
CAUTION
NOTE: Set Close Travel Limit
before setting Open Travel
Limit for unit to operate
normally.
Unless limits are being reset
do not press set limit buttons.