


4
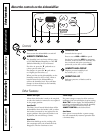
About the controls on the dehumidifier.
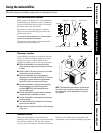
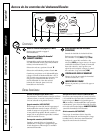
Controls
POWER Pad
Press to turn the dehumidifier on and off.
HUMIDITY CONTROL Pads
The humidity level can be set within a range
of 35% RH (Relative Humidity) to 70% RH
(Relative Humidity) in 5% increments.
For drier air, press the pad and set to
a lower percent value (%).
For damper air, press the pad and set
to a higher percent value (%).
When you first use the dehumidifier, set the
humidity control to 45% or 50%. Allow at
least 24 hours for the dehumidifier to
achieve the humidity level. If you still have
damper air than desired, set the humidity
level to a lower setting.
FAN SPEED Pad
Controls the fan speed.
Press to set to HIGH or LOW fan speed.
Set the fan control to HIGH for maximum
moisture removal. When the humidity has
been reduced and quiet operation is
preferred, set the fan control to LOW.
HUMIDITY LEVEL DISPLAY
Displays percent humidity level.
Its accuracy is (+/– 5%).
BUCKET FULL LED
Indicates presence of bucket and its
fill level.
▲
▼
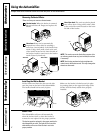
Other Features
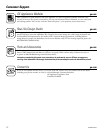
BUCKET FULL Light
Glows when the bucket is ready to be emptied,
or when the bucket is removed or not replaced
in the proper position.
Auto Shut Off
The Water Level Control Switch shuts off the
dehumidifier when the bucket is full, or when
the bucket is removed or not replaced in the
proper position. Also, when the bucket is out
of position, the unit will beep 3 times.
Auto Defrost
When frost builds up on the cooling coils,
the compressor will cycle off until the frost
disappears. The fan continues to run.
Power Outage
If a power outage occurred or if the unit was
unplugged, the unit will display its prior setting.
Note: If ON is in the display, the dehumidifier is
operating continuously, but a specific humidity
level is not set. You will need to reset the
HUMIDITY CONTROL to the desired level.
Auto Restart
Once power is restored after a power outage,
the unit automatically resumes operation after
a 2 minute delay.
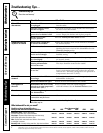
Consumer Support
Troubleshooting Tips Operating Instructions Safety InstructionsTroubleshooting Tips Care and Cleaning Safety InstructionsOperating Instructions