


Window Mounting
(continued)
4.
bcate
Cabinet
in Window.
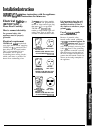
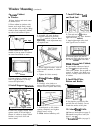
1.
Open window and mark center
of window stool.
2. Place cabinet in window with
bottom stool angle firmly seated
over window stool as shown. Bring
window down temporarily behind
top rail to hold cabinet in place.
I
stool
I
+*$
Stool Angle
LJ
3.
Shift cabinet left or right as
needed to line up center of cabinet
on center line marked on stool.
Type B
S;rews
4.
Fasten cabinet to window stool
with 2 Type B screws. (You may
want to drill pilot holes. )
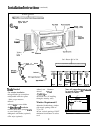
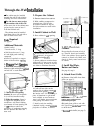
5. Install Support
Bracke&.
lpecscrewsandLocknuts
~
reaulred for each
suDDort
bracket)
.
.
,,
fk
---
~
RIGHT
QQ
‘
:%
%
[ Type D
Bolt”
o
‘o
p
I
LEFT
o
00/
w
0
0
Sill Angle Bracket”
*(1 required for each support bracket)
1.
Hold each support bracket flush
against outside of sill and tight to
bottom of cabinet as shown. Mark
brackets at top level of sill and
remove them.
2.
Assemble sill angle brackets
to support brackets at positions
previously
marked, as-shown. Hand
tighten only—some adjustment may
be required later.
1
I
3. Install support brackets, with sill
angle brackets attached, to cabinet
as shown.
4. Tighten all 6 bolts securely.
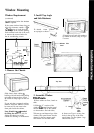
6. Etiend Window
Hller
Panek.
1.
Carefully raise window to
expose filler panel locking screws.
Loosen screws so panels slide easily.
—
—
2. Extend panels to fill window
opening completely and tighten
locking screws on top.
3. Close
window behind top rail.
10
7. Install Window
hck
and Sash Seal.
1.
Trim sash seal to
fit
window
width and insert into space between
upper and lower
sashe;.
2. Attach right angle safety lock
with Type B screw as shown.
3.
Position bottom rail seal on
3
bottom rail flush with front edge of
rail and in
conmct
with side seals.
&
Sfide~assis
into Cabinet.
Be sure handle at bottom of unit is
up. Then
lifi
chassis and carefully
slide it into cabinet. Do not push on
controls or finned coils. Make sure
chassis is firmly seated toward rear
of cabinet.
9. Instill Dial Plate,
Button and Knobs.
If dial plate has a protective film,
peel the film off carefully. Do not
scratch the surface of the plate.
10. Attach
Pront
Grille.
(a)
Remove inlet baffle (see page 5).
(b)
Attach front grille to unit (see
page 11, step
6b).
(c)
ReinsMl
irdet
baffle (see page 5).