


GWS 10 installation instructions EN–4
EN
+
-
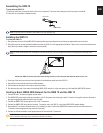
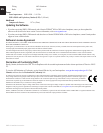
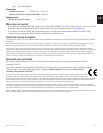
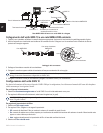
NMEA 2000 power cable
Female terminator
T-connectors
In-line lightning arrestor
Field-installable connector
NMEA 2000 backbone cable
NMEA 2000 drop cable
In-line terminator
GWS 10
GMI 10
NMEA 2000
drop cable
A Basic NMEA 2000 Network with the GWS 10 Attached
Connecting the GWS 10 to an Existing NMEA 2000 Network
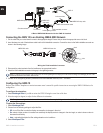
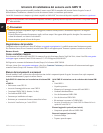
1. Cut the cable that you routed down the mast to the appropriate length. Ensure that you leave the appropriate amount of slack.
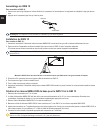
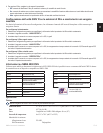
2. Insert the bare-wire end of the backbone cable into the eld-installable connector. Connect the wires to the eld-installable connector as
shown in the following image.
1
2
3
4
➄
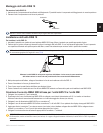
NMEA 2000 cable
NMEA 2000 bare wire
red
bare wire
blue
white
black
Wiring the Field-Installable Connector
3. Disconnect the male terminator from the backbone at an appropriate location.
4. Attach the eld-installable connector to the gray in-line lightning arrestor.
NOTE: If lightning strikes the mast or the wind sensor, the in-line lightning arrestor helps prevent the electrical charge from damaging the rest of the
instruments connected to the NMEA 2000 network.
5. Connect the in-line lightning arrestor (connected to the eld-installable connector) to a T- connector.
Conguring the GWS 10
Refer to your Garmin Chartplotter or marine instrument owner’s manual for specic instructions on accessing the NMEA 2000 devices for
conguration.
To congure the orientation:
1. Select Wind Angle Offset if you did not orient the GWS 10 facing the exact front of the boat.
2. Select the angle (in degrees) to adjust for the difference in orientation.
TIP: The angles are congured clockwise around the mast of the boat. For example, 90 degrees is starboard while 270 degrees is port.
To adjust the lter settings:
1. Select Wind Angle Filter.
2. Choose from the following settings to adjust the lter:
Off—turn off the lter to make the display more sensitive to changes in the wind.
On—select a higher number to increase how sensitively the display reacts to changes in the wind angle, or select a lower number to
decrease the sensitivity.
Auto—automatically adjusts the lter settings based on wind conditions.
3. Select Wind Speed Filter.
•
•
•