


Fitting the Collar on Your Dog
CAUTION
To prevent irritation from the contact points, remove the collar
for at least eight hours out of every 24-hour period.
This device is not intended for human use. Do not attempt to
use on any person.
NOTICE
Before you put the collar on the dog, remove the charging clip. If
you do not remove the clip, it may become detached from the
collar and become lost.
In order to properly detect and correct barks, the collar and
device must fit the dog properly. If the collar is too loose or
positioned incorrectly, bark corrections may be inconsistent.
This can delay or prevent the dog from learning not to bark.
1
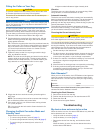
Place the collar around the middle of the dog's neck.
2
Position the device at the front of the dog's neck, with the
status LED facing towards the dog's chin and the contact
points against the throat.
TIP: The device contact points should be positioned near the
dog's vocal cords. This location varies based on the breed of
dog. If the device does not seem to detect the dog's barks,
you should move the device closer to or further from the
dog's body to find the ideal location.
3
Tighten the strap so that it is very snug around the dog's
neck, and fasten the buckle.
NOTE: The collar should fit tightly and should not be able to
rotate or slide on the dog's neck. The dog must be able to
swallow food and water normally. You should observe your
dog's behavior to verify that the collar is not too tight.
4
Wiggle the device to work the contact points through the
dog's coat.
NOTE: The contact points must have contact with the dog's
skin to effectively detect and correct barks.
5
If the strap is too long, cut off the excess, leaving at least
3 in. (8 cm) to spare.
TIP: You can mark the hole used to fasten the buckle for
future reference.
Changing the Bark Correction Mode and
Intensity Level
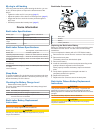
Rotate the dial to select an option:
• To correct using vibration, select V (page 2).
• To correct using automatic intensity, select A (page 2).
• To correct using a set intensity level, select 1 to 7
(page 2).
A higher number indicates a higher intensity level.
Vibration
The device can use a short vibration to correct the dog. When
using vibration, no electrical stimulation is used.
Automatic Intensity
The device can set the stimulation intensity level automatically
based on the barking behavior of the dog. The device starts at
the lowest intensity level and increases the intensity level
gradually until the dog stops barking. When the dog is quiet, the
intensity decreases over time.
The automatic intensity feature is designed to eliminate
excessive nuisance barking. To stop barks more immediately,
you should set the intensity level manually.
Choosing the Correct Intensity Level
CAUTION
To prevent irritation from the contact points, remove the collar
for at least eight hours out of every 24-hour period.
You can set the stimulation intensity level manually from 1 to 7.
You should choose the lowest intensity level that discourages
the dog from barking. If you have never used a bark correction
collar with the dog, the dog requires time and experience to
learn that the bark is the cause of the stimulation.
1
Set the intensity to the lowest level.
2
For thirty minutes, when the dog barks, observe the dog for a
reaction, such as a head shake, neck movement, a change
in the way the dog barks, or just a change in expression.
3
If there is no reaction, increase the intensity by one level until
the dog has a slight but recognizable reaction to the
stimulation.
4
Allow 24 hours for the dog to learn to respond by not barking.
5
If the dog continues barking while wearing the collar,
increase the intensity level gradually until you find the level
that discourages the dog from barking.
Bark Odometer™
When you turn off the device, the LED flashes red and green to
report the number of times the device detected a bark since it
was last turned on. This can help you track your dog's barking
behavior.
Red flash 10 barks
Green flash 1 bark
For example, one red flash followed by four green flashes
indicates the device detected 14 barks.
Checking the Bark Odometer
1
Remove the device from the dog.
2
Position the device so that you can see the status LED.
3
Rotate the dial to N.
4
Count the red and green flashes.
Troubleshooting
My device does not seem to be active
When the device is active, the status LED flashes only when the
device detects a bark or motion.
• Verify the collar is turned on (page 1).
• Verify the battery is not low (page 3).
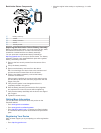
• Remove the device from the dog, and shake the device
briefly.
When the device is active, the device detects the motion,
and the status LED flashes.
2 Troubleshooting