


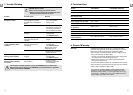


Operation of a Micro-Drip-
System:
The operation of a Micro-Drip-System is possible. Here, the maxi-
mum values stated in the accompanying manual of the Master
Unit 2000 are reduced. With Art. No. 1742, at least 90 l/h must be
taken as otherwise the leakage protection is activated.
4000/2 (Art. No. 1740):
Dry-Running Safety:
9
So that the pump automatically switches off when there is
noliquid to pump, the Float Switch
9
must be able to freely
move on the surface of the water.
Switch-off height:
If the water level (with the foot fitted) drops below the cut-out
level (approx. 25cm), the float switch
9
automatically switches
off the pump (Dry-Running Safety).
Switch-on height:
When the water level has risen over the cut-in height
(approx. 57cm), theFloat Switch
9
automatically switches
the pump on.
4000/2 automatic (Art. No. 1742):
Automatic mode: The pump automatically switches off as soon as no more water is
retrieved. Due to the non-return valve, the pressure is maintained
in the hose until water is drawn via the hose. When water is drawn
via the hose (the pressure in the hose falls below 1.3 bar), the
pump switches on automatically.
Dry-Running Safety: When there is no liquid to pump, the pump automatically switches
off. The pump then switches in the cycle on 30 sec. – 5 sec.
off (4x). In 1 hr., 5 hrs., 24 hrs., 24 hrs.... this cycle is repeated.
Assoon as the pump stands in at least 4.5 cm water, the pump
isready for operation again.
Leakage protection: If there is leakage on the pressure side (e.g. a leaking pressure
hose or connecting device), the pump automatically switches on
and off in short intervals. When the pump switches on and off
more frequently than 7 x in 2 min. (with a leakage less than 3 l/h),
the pump switches completely off. When the leakage on the
pressure side is eliminated, the pump must be unplugged and
plugged in again in order to be operational again.
5. Putting into Storage
Storage:
b
a
The storage location must not be accessible to children.
v Store the pump away from frost
before the first frost sets in.
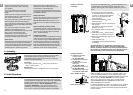
Transport position:
1. Unscrew telescopic pipe
3
and
attach to the side of pump.
Here, ensure that the nose
a
is
slid into the slot
b
.
2. Wind mains cable
6
around the
cable holder
0
and the pump
connector
4
.
In the transport position, the pump
can be carried by the telescopic
pipe
3
. For easier winding of the
mains cable
6
, push up the slide
bar
q
of the cable holder
0
.
3
q
6
4
0
Disposal:
(in accordance with
RL2002/96/EC)
The product must not be added to normal household waste.
It must be disposed of in line with local environmental regulations.
6. Maintenance
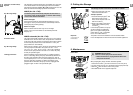
Clean filter:
2
w
e
1
DANGER! Electric shock!
There is a risk of injury from electric shocks.
v Before maintenance, unplug the Rain Water Tank
Pump from the mains.
After pumping dirty water, the filter should be cleaned.
1. Press the two locks
1
and remove the foot
2
from the pump.
2. Turning suction foot
w
1/4 to the left and remove (bayonetlock).
3. Remove
e
filter and clean under running water.
4. Re-install
e
filter in the opposite sequence.
12
GB
13
GB