


9
2009 Electrolux Home Products, Inc. All rights reserved.
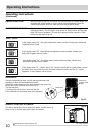
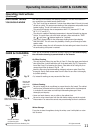
FAN MODE:
In this mode there is no need to use the exhaust hose or drainage hose.
However, if you require stale or smokey air to be removed from the room,
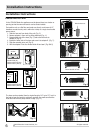
hook up the duct accessories as described in the "EXHAUSTING HOT AIR"
section.
1. Press the MODE button until the "Fan" indicator lights.
2. Press the FAN button to choose the desired fan speed.
3. The fan will run at the selected speed and the display will show the room temperature.
DRY MODE:
In this mode you do not need to use the exhaust adaptor hose, BUT the water
collected must be discharged. See Drainage Section.
1. Press the MODE button until the "Dry" indicator lights.
2. The fan will run at low speed and the display will show the room temperature.
3. Keep doors windows closed for best effect.
SLEEP OPERATION:
Note: This feature is unavailabe under FAN or DRY modes.
In this mode the selected temperature will increase by 2 °F 30 minutes after the mode
is selected. The temperature will then increase by another 2 °F after an additional 30
minutes. This new temperature will be maintained for 7 hours before it returns to the
originally selected temperature. This ends the "Sleep" mode and the unit will continue to
operate as originally programmed. The "Sleep" mode program can be cancelled at any
time during operation by again pressing the "Sleep" button.
In this mode the exhaust adaptor hose MUST be used.
COOLING MODE:
1. Press the MODE button until the "Cool" indicator lights.
2. Press the " " Temp buttons for desired setting.
3. Press the FAN button for desired fan speed.
In this mode you do not need to use the exhaust adaptor hose.
HEATING MODE:
(on some models)
1. Press the MODE button until the "Heat" indicator lights.
2. Press the " " Temp buttons for the desired heat setting.
TIMER OPERATION:
You can set both delay stop and delay start while unit is in ON position or OFF position.
When unit is in ON position, first press TIMER button to go to delay stop setting, then
“timer off” light will illuminate, tap or hold the UP arrow ( ) or the DOWN arrow ( ) to
change delay stop timer at 0.5 hour increments up to 10 hours, then at 1 hour increments
up to 24 hours. Then press the TIMER button to confirm the setting (the control will confirm
the setting automatically after 5 seconds) and go to delay start setting. Use the same way
as above to set the delay start timing. If you don’t need to set delay start, press the
TIMER button again to exit. After 5 seconds, the control will automatically change the
display back to previous temperature display. If you want to check remain timing, press the
TIMER button. The delay start operation automatically selects mode, temperature and
fan speed the same as last operation you set.
When unit is in OFF position, press TIMER button will first go to delay start setting, then
“timer on” light will illuminate, set the delay start and delay stop timing the same way
as above.
To cancel the timer setting, simply tap ( ) or ( ) button to change the timing to 0.0.
Always have the exhaust hose attached in this mode.
AUTO MODE:
When you set the air conditioner in AUTO mode, it will automatically select cooling,
heating(inapplicable for cooling only models), or fan only operation depending on what
temperature you have selected and the room temperature. The air conditioner will
control room temperature automatically round the temperature point set by you. Under
AUTO mode, you can not select the fan speed.
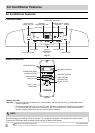
NOTE
The following instructions represent the Control Panel, the same instructions can be used for the Remote Control.
Operating Instructions
Operating Instructions