6
Sash window installations
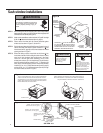
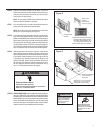
STEP 1 After removing the unit from shipping carton, remove tape holding
decorative front in place. Lay front in a safeout-of-the-way place, then
slidechassisout of cabinet(see Figure A).
STEP 2 Attach curtain assemblies to cabinet as shown in Figure B. Use eight
(8)No. 8 x
"slottedhexheadscrews(item#1,page6).
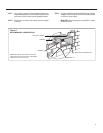
STEP 3 Center cabinet in window with sill channel positioned against
window stool as shown in Figure C, Section A-A.
STEP 4 Pull window sashdown behind Shell Support Channel on topof
cabinet; this helps hold cabinet in place. Install No. 8 x
" hex
headscrew(item#3, page6)in sill channelat bottom of window
opening asshown in Figure C.
STEP 5 Extend the sliding curtains on each side so the frames
t into
thewindowchannels.Whileholdingthecurtainframesinplace,
mark four (4) hole locations (hole locations are in the upper
corners on left and right curtain assembly), two (2) in the
window jamb and two (2) in the window sash. Slip the curtains
back from markedlocations anddrill four(4)
7
/
64
" diameterpilot
holes. Again, extendthe slidingcurtainson eachsideand then
install two (2) no.8 x ½" Phillips headscrews (item #2, page6)
and two (2)No.8 x1 ¼" Phillips headscrews (item#4) through
the curtain frames as shown in Figure C.
Figure A
BASEPAN HANDLE
PULL STRAP
TOPULLUNITFROMSLEEVE,USE PULLSTRAP ANDBASEPAN
HANDLELOCATEDONFRONT. OBTAINASSISTANCEOR HELP
ASNECESSARYTOHOLDSLEEVEWHILEPULLINGUNITFROM
SLEEVE. MAKESUREAIRCONDITIONERISONFIRMSUPPORT
BEFOREREMOVINGUNITFROMSLEEVE.
WHEN CARRYING OR HANDLING UNIT, OBTAINASSISTANCE OR
HELPAS NECESSARY TO SUPPORT UNIT FROM BOTTOM (BASE
PAN), MAINTAINING CLEARANCE FROM ALL OBSTACLES.
CURTAIN
ASSEMBLY
RETAINING
BRACKET
CURTAIN
ASSEMBLY
(LEFT)
SHELL SUPPORT
CHANNEL
Figure B
SCREW #8 x
"SLOTTEDHEXHEAD
(ILLUSTRATION ONPAGE6, ITEM #1)
8REQUIRED (4EACH SIDE).INSTALL
FROMINSIDE SLEEVETOCURTAIN
ASSEMBLY RETAININGBRACKET
CURTAIN
ASSEMBLY
(RIGHT)
Figure C
SECTION A-A
SCREW,1/2”PHILLIPSHEAD
(See illustration,item#2,page6)
SCREW,11/4” PHILLIPSHEAD
(See illustration,item#4,page 6)
SCREW,#8 x7/8”HEXHEAD
(See illustration,item#3,
page6)
WINDOWSTOOL
SILL
CHANNEL
SHELLSUPPORT CHANNEL
WINDOWSASH
CABINET
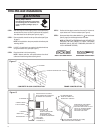
Falling Object Hazard
Not following Installation Instructions
for mounting your air conditioner can
result in property damage, injury, or
death.
WARNING
Cut/Sever
Although great care has been
taken to minimize sharp edges
in the construction of your unit,
use gloves or other hand
protection when handling unit.
Failure to do so can result in minor
to moderate personal injury.
CAUTION
Excessive Weight Hazard
Use two or more people when
installing your air conditioner.
Failure to do so can result in
back or other injury.
CAUTION


