


20
www.retroaire.com
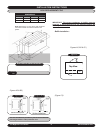
The Right Fit For Comfort
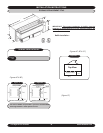
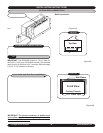
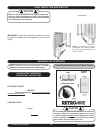
1. Make sure the chassis is level. Check by pouring water
into the drain pan and making certain it flows through
the drain hoses to the condenser side of the unit.
2. Plug or hard wire line voltage to unit.
IMPORTANT: Follow the information provided on the rat-
ing plate for voltage and amperage/fuse size for proper
supply.
3. Attach the front panel to the existing cabinet enclo-
sure.
4. Turn the power on.
5. Check for proper operation (i.e., cooling, optional fresh
air, and heating if supplied).
6. Check to be sure nothing will interfere with the room
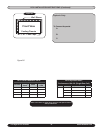
UNIT MOUNTED THERMOSTAT
OPERATIONAL INSTRUCTIONS
Turning the unit mounted thermostat knob to the far left
will produce the warmest room temperature while turning
it all the way to the right will produce the coolest. These
settings can be adjusted for personal comfort.
RC12 SAFETY NOTE: When turning the selector switch on
the RC12 for mode of operation, it is very important to make
sure the switch position is
“SEATED” directly on a mode of
operation (clicks into position). Do not mistakenly place
between two positions. This can result in a potential fan
failure while the system is in a cooling or heating operation.
A fan failure could result in the unit overheating (smoke) in
an electric heating mode, or freezing coil in a cooling mode.
COOLING CYCLE:
1. Place system switch in the “COOL” position.
2. Rotate thermostat knob (below) clockwise until the com
-
pressor fans start running and cold air begins to flow
from the unit. For a colder room temperature, continue
turning the thermostat knob
clockwise and let the unit
continue operating to cool the room and remove humid
-
ity. If a warmer room temperature is desired, rotate the
thermostat knob counter-clockwise until the compressor
cycles off.
FINAL INSPECTION AND STARTUP
SEQUENCE OF OPERATION
Avoid rotating the thermostat knob back and forth from
heating to cooling. This causes the compressor to cycle
on and off rapidly and
WILL cause damage to the com-
pressor.
Allow the compressor to remain off for at least
three minutes prior to restarting the unit.
!
!
CAUTION
When the unit is first powered up, high humidity condi-
tions can cause condensation to form on the discharge
grill. Keep doors and windows closed to reduce humidity
and condensation will evaporate.
!
!
CAUTION
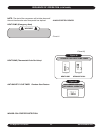
discharge air or the return air to the units (i.e., curtains
or drapes that obstruct the air flow or plush carpeting
that can obstruct the return air (see below)). Items like
these can cause serious damage to the chassis and
can void the warranty.
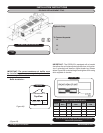
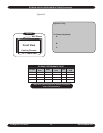
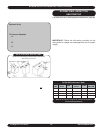
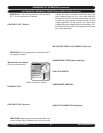
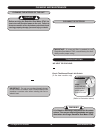
Typical Representation Of A Unit Mount Control
NOTE: RetroAire units can be equipped with Unit
Mounted or Remote Controlled Thermostats.
NOTE: Any obstruction of supply air
including the use of deflector baffles,
may cause condensate to form on the
louver or cabinet.
To ensure optimum performance of your PTAC,
avoid restricting the air flow.
The position of curtains or drapes
over supply air grille may cause air to
recirculate without cooling the room.
The unit will short cycle and may cause
premature compressor failure.
FAN SPEED SWITCH
SYSTEM
SWITCH
THERMOSTAT KNOB