


www.fmiproducts.com
122638-01E 7
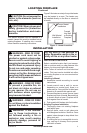
Tools and building supplies required for
installation:
• Saw • Square
• Pliers • Gloves
• Hammer • Level
• Phillips screwdriver • Surround
• Framing materials • Electric drill/bits
• Tape measure
• Wall-nishing materials
• Caulking material
INSTALLATION
Continued
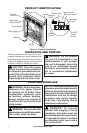
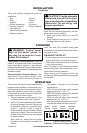
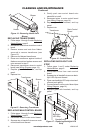
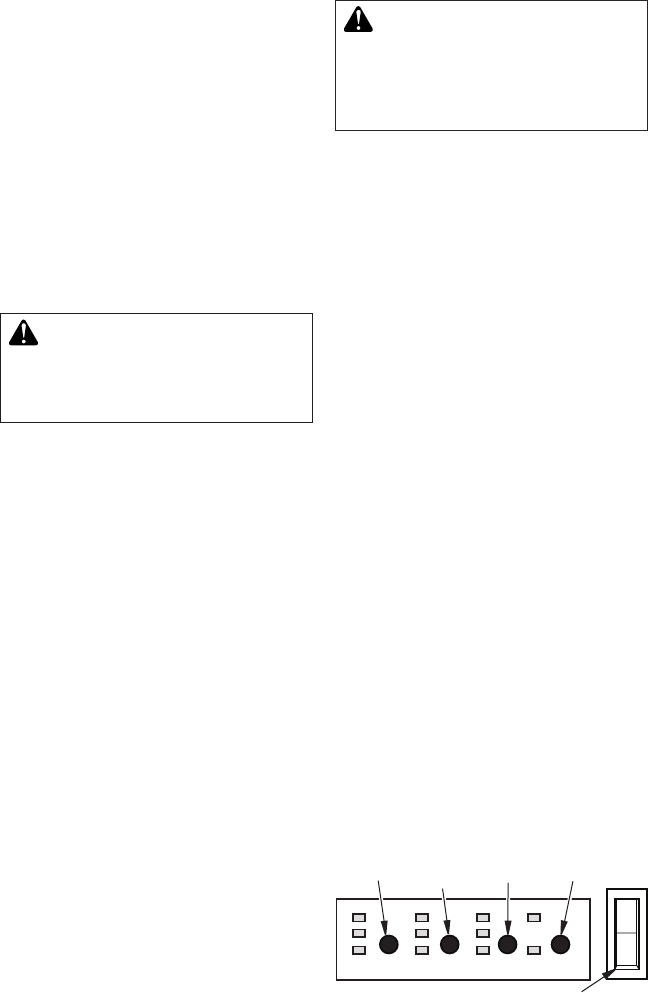
Heater Flame EmberBacklight
Power
Figure 6 - Controls For Electric Fireplace
Lighted Power Switch
Ember
Control
Heater
Control
Flame
Control
FINISHING
WARNING: Control panel
door on this heater cannot, in
any way, be covered as it may
create a re hazard.
Combustible Finishing Material: Materials
made of or surfaced with wood, compressed
paper, plant bers, plastics or any material
capable of igniting and burning, whether ame
proofed or not, plastered or unplastered (this
includes drywall).
Noncombustible Finishing Material : Ma-
terials which will not ignite and burn. Such
materials are those consisting entirely of
steel, iron, brick, tile, concrete, slate, glass
or plasters or combinations thereof or have a
re rating of zero.
FINISHING CHECKLIST
• Power supply service must be completed
prior to nishing to avoid reconstruction.
• Grills and air openings cannot be covered
in any circumstances.
Note: The heater is a zero clearance replace
and may be nished with combustible or non-
combustible nishing materials.
When using paint or lacquer to nish the
mantel, they must be heat resistant to prevent
discoloration.
Backlight
Control
CAUTION: Provide adequate
clearances around the air open-
ings and adequate accessibility
clearances for servicing and
proper operations.
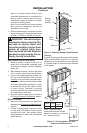
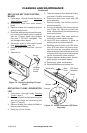
Installing as Insert
Once the site has been prepared, your re-
place insert can be installed.
1. Make sure power switch is in the OFF
position.
2. Push replace insert so trim is against
nished mantle or wall surface.
OPERATION
The controls (see Figure 6) are located behind
hinged control panel door. If using heater, con-
trol panel door will be hot during and immedi-
ately after operation. Open door by pressing
on right side. A spring magnet will push door
forward. Pull door down to open.
1. Connect replace to power source. Turn
on lighted power switch (see Figure 6).
2. Adjust Flame/Ember/Backlight/Heater
to desired settings using the control pad
on replace (Figure 6) or remote control
(Figure 7, page 8). Figure 8, page 8,
shows replace settings available. Default
settings are circled. Press control pad or
remote control buttons once and release
to adjust settings.
Note: When on, ember bed will lighten
and darken automatically to simulate real
embers.
The heater is pre-set to the following
temperatures:
HIGH will shut off when room reaches
approximately 86° F (30° C).
MEDIUM will shut off when room reaches
approximately 79° F (26° C).
LOW will shut off when room reaches
approximately 72°F (22° C).
Note: Fan on heater will continue to run for 5-7
seconds after heater has been turned off.