


USING THE SILENCE FEATURES
Never remove the batteries to quiet an unwanted alarm. Removing the
batteries disables the alarm and removes your protection.
The Silence Feature is intended to temporarily silence the horn while you
identify and correct the problem. Do not use the Silence Feature in emergency
situations. It will not correct a CO problem.
The Silence Feature can temporarily quiet an unwanted alarm for several
minutes. You can silence this Alarm by pressing the Test/Silence button on
the alarm cover for at least 3-5 seconds.
After the Test/Silence button is released, the Red LED blinks during the silence
mode.
When the CO Alarm is Silenced the CO Alarm will remain silent for up to
4 minutes. After 4 minutes, if CO levels remain potentially dangerous the horn
will start sounding again.
SILENCING THE LOW BA
TTER
Y W
ARNING
This silence featur
e can temporarily quiet the low battery war
ning “chirp” for
up to 8 hours. You can silence the low battery warning “chirp” by pressing the
Test/Silence button on the alarm cover.
Once the low battery war
ning “chirp” silence featur
e is activated, the unit
continues to flash the Green light twice a minute for 8 hours. After 8 hours, the
low battery “chirp” will r
esume.
Replace the batteries as soon as possible;
this unit will not operate without battery power!
To deactivate this feature: Press the Test/Silence button again. The unit will
go into Test Mode and the low battery warning will resume (LED flashes and
unit sounds “chirp” once a minute).
LA
TCHING FEATURES
Alarm Latch is activated after an Alarm is exposed to alarm levels of
carbon
monoxide
. After CO levels drop below alarm levels, the “CO” Red LED will
begin to flash On for 2 seconds/Of
f for 2 seconds. It will continue to flash or
“latch” for about 15 minutes, to give you time to determine which unit initiated
the alarm.
Low Battery Latch is activated when the Alarm is in the "low battery condition".
When this occurs, the Power LED flashes Gr
een On for 2 seconds/Of
f for 2
seconds for about 15 minutes. This featur
e is designed to help you identify
which Alarm needs to have the battery replaced. Although, the Alarm will
sound the low battery chirp approximately once every minute, sometimes
during the initial stages of "low battery", the Alarm will chirp in gr
eater intervals
than one minute, sometimes up to several hours, until the battery reaches a
steady low battery level. This innovative featur
e eliminates the frustration of
waiting for and/or identifying which unit is chirping.
WEEKLY TESTING
•
Test the CO Alarm once a week. If the CO Alarm ever fails to test
pr
operly, have it replaced immediately! If the CO Alarm is not
working properly, it cannot alert you to a problem.
•
DO NOT stand close to the Alarm when the horn is sounding.
Exposur
e at close range may be harmful to your hearing.
When testing, step away when horn starts sounding.
It is important to test this unit every week to make sure it is working
properly. Using the test button is the recommended way to test this CO
Alar
m.
Y
ou can test this CO Alarm by
pr
essing and holding the Test/Silence button
on the Alarm cover (typically 3-5 seconds).
During testing, you will see and hear the following sequence:
•
The
Hor
n
will sound 4 beeps, pause, 4 beeps. The Power LED will be
Off and the
CO LED flashes Red.
If the unit does not alarm, make sure the batteries are correctly installed, and
test again. If the unit still does not alarm, r
eplace it immediately.
REGULAR MAINTENANCE
This unit has been designed to be as maintenance-free as possible, but there
ar
e a few simple things you must do to keep it working properly.
Use only the r
eplacement batteries listed below. The unit may not
operate pr
operly with other batteries. Never use rechargeable batteries
since they may not provide a constant charge.
•
Test it at least once a week.
•
Clean the CO Alarm at least once a month; gently vacuum the outside
of the CO Alarm using your household vacuum’s soft brush attachment.
A can of clean compr
essed air (sold at computer or office supply stores)
may also be used. Follow manufactur
er instructions for use. Test the CO
Alarm. Never use water, cleaners or solvents since they may damage the
unit.
• If the CO Alarm becomes contaminated by excessive dirt, dust and/or
grime, and cannot be cleaned to avoid unwanted alarms, replace the unit
immediately.
• Relocate the unit if it sounds frequent unwanted alarms. See “Where CO
Alarms Should Not Be Installed” for details.
Choosing a replacement battery:
Your CO Alarm requires two standard AA batteries. The following batteries are
acceptable as replacements: Energizer E91. These batteries are available at
many local retail stores.
Actual battery service life depends on the CO Alarm and the environment in
which it is installed. All the batteries specified above are acceptable replace-
ment batteries for this unit. Regardless of the manufacturer’s suggested
battery life, you MUST replace the battery immediately once the unit starts
“chirping” (the “low battery warning”).
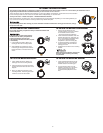
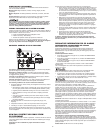
To replace the batteries (without removing Alarm from the ceiling or wall):
1. Open the battery compartment.
2. Press tabs A and B as shown in the
diagram and remove each battery.
3. Insert the new batteries, making sure
they snap completely into the battery
compartment. Match the terminals on
the ends of the batteries with the
terminals on the unit.
4. Close the battery compartment, and
then test the unit by pr
essing the
Test/Silence button.
A
B
“ALARM—MOVE TO FRESH AIR”
If you hear the CO alarm horn and the CO red light is flashing,
move everyone to a source of fresh air.
DO NOT remove the batteries!
IF YOUR CO ALARM SOUNDS
Actuation of your CO Alarm indicates the presence of carbon monoxide
(CO) which can kill you. In other wor
ds, when your CO Alarm sounds,
you must not ignor
e it!
IF THE ALARM SIGNAL SOUNDS
1. Operate the Test/Silence button.
2. Call your emergency services, fire department or 911. Write down the
number of your local emer
gency service here:
________________________________________________________________
3. Immediately move to fresh air—outdoors or by an open door or window.
Do a head count to check that all persons ar
e accounted for. Do not re-
enter the premises, or move away from the open door or window until the
emergency services responder has arrived, the premises have been aired
out, and your CO Alarm r
emains in its normal condition.
4.
After following steps 1-3, if your CO Alarm reactivates within a 24-hour
period, r
epeat steps 1-3 and call a qualified appliance technician to investi-
gate for sources of CO from fuel-burning equipment and appliances, and
inspect for pr
oper operation of this equipment. If problems are identified
during this inspection have the equipment serviced immediately
. Note any
combustion equipment not inspected by the technician, and consult the
manufactur
ers’ instructions, or contact the manufacturers directly, for more
information about CO safety and this equipment. Make sur
e that motor
vehicles are not, and have not, been operating in an attached garage or
adjacent to the r
esidence. Write down the number of a qualified appliance
technician here:
________________________________________________________________
Alarms have various limitations. See "General Limitations of CO Alarms"
for details.
What You See and Hear
Refer to section “What Y
ou Will See and Hear With This Alarm”.
WHAT YOU NEED TO KNOW ABOUT CO
WHAT IS CO?
CO is an invisible, odorless, tasteless gas pr
oduced when fossil fuels do not
burn completely, or are exposed to heat (usually fire). Electrical appliances
typically do not produce CO.
These fuels include: Wood, coal, charcoal, oil, natural gas, gasoline, kerosene,
and propane.
Common appliances ar
e often sources of CO. If they are not properly main-
tained, ar
e impr
operly ventilated, or malfunction, CO levels can rise quickly
. CO
is a real danger now that homes are more energy efficient. “Air-tight” homes
with added insulation, sealed windows, and other weatherproofing can “trap”
CO inside.
5