


WEEKLY TESTING
NEVER use an open flame of any kind to test this unit. You might acci-
dentally damage or set fire to the unit or to your home. The built-in test
switch accurately tests the unit’s operation as required by Underwriters
Laboratories, Inc. (UL). If you choose to use an aerosol smoke product
to test the Smoke Alarm, be certain to use one that has been Listed to
Underwriters Laboratories, Inc. Safety Standards, and use it only as
directed. Use of non-UL Listed products or improper use of UL Listed
products may affect the Smoke Alarm’s sensitivity.
DO NOT stand close to the Alarm when the horn is sounding. Exposure
at close range may be harmful to your hearing. When testing, step away
when horn starts sounding.
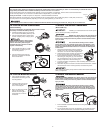
It is important to test this unit every week to make sure it is working prop-
erly. Using the test button is the recommended way to test this Smoke
Alar
m. Pr
ess and hold the test button on the cover of the unit until the alarm
sounds (the unit may continue to alarm for a few seconds after you release the
button). If it does not alarm, make sure the unit is receiving power and test it
again. If it still does not alarm, replace it immediately. During testing, you will
hear a loud, r
epeating hor
n pattern: 3 beeps, pause, 3 beeps, pause.
When testing a series of inter
connected units you must test each unit individ
-
ually
. Make sur
e all units alarm when each one is tested.
REGULAR MAINTENANCE
Use only the replacement batteries listed below. The unit may not
operate properly with other batteries. Never use rechargeable batteries
since they may not pr
ovide a constant char
ge.
This unit has been designed to be as maintenance-free as possible, but there
are a few simple things you must do to keep it working properly.
•
T
est it at least once a week.
•
Clean the Smoke Alarm at least once a month; gently vacuum the
outside of the Smoke Alarm using your household vacuum’s soft brush
attachment. Test the Smoke Alarm. Never use water, cleaners or solvents
since they may damage the unit.
• If the Smoke Alarm becomes contaminated by excessive dirt, dust and/or
grime, and cannot be cleaned to avoid unwanted alarms, r
eplace the unit
immediately.
• Relocate the unit if it sounds frequent unwanted alarms. See “Locations
To Avoid For Smoke Alarms” for details.
• When the battery back-up becomes weak, the Smoke Alarm will “chirp”
about once a minute (the low battery warning). This warning should last 7
days, but you should replace the battery immediately to continue your
pr
otection.
Choosing a replacement battery:
Y
our Smoke Alarm requires one standard 9V battery. The following batteries
are acceptable as replacements: Duracell #MN1604, (Ultra) #MX1604;
Ever
eady (Energizer) #522, Eveready (Energizer) #1222. You may also use a
Lithium battery like the Ultralife U9VL-J for longer service life between battery
changes.
These batteries are available at many local retail stores.
Actual battery service life depends on the Smoke Alarm and the environment in
which it is installed. All the batteries specified above ar
e acceptable replace-
ment batteries for this unit. Regar
dless of the manufacturer’s suggested battery
life, you MUST replace the battery immediately once the unit starts “chirping”
(the “low battery war
ning”).
IF THIS SMOKE ALARM SOUNDS
RESPONDING TO AN ALARM
During an alarm, you will hear a loud, repeating horn pattern: 3 beeps,
pause, 3 beeps, pause.
•
If the unit alarms and you are not testing the unit, it is warning you
of a potentially dangerous situation that requires your immediate
attention. NEVER ignor
e any alarm. Ignoring the alarm may result
in injur
y or death.
•
Never disconnect the AC power to quiet an unwanted alarm.
Disconnecting the power disables the Alarm so it cannot sense
smoke. This will remove your protection. Instead open a window
or fan the smoke away fr
om the unit. The alarm will reset auto-
matically.
• If the unit alar
ms get everyone out of the house immediately.
•
ELECTRICAL SHOCK HAZARD: Attempting to disconnect the power
connector from the unit when the power is on may result in electrical
shock, serious injury or death.
When an interconnected system of AC powered units is in alarm, the alarm
indicator light on the unit(s) that initiated the alarm will blink rapidly. It will
remain OFF on any remaining units.
If the unit alarms and you are certain that the source of smoke is not a fire—
cooking smoke or an extremely dusty furnace, for example—open a nearby
window or door and fan the smoke away from the unit. Use the Silence
Feature to silence the alarm. This will silence the alarm, and once the smoke
clears the unit will reset itself automatically.
5
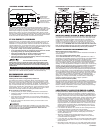
UNDERSTANDING THE INDICATOR LIGHTS
AND ALARM HORN P
ATTERNS
Condition
LED (Red or Green
Lights)
Hor
n
Normal Operation
(AC Power)
Gr
een LED ON; flash-
ing Red LED once/
minute
No Audible Alarm
DURING
TESTING Red LED flashes
once every
second
Hor
n pattern:
3 beeps, pause, 3
beeps, pause
LOW OR MISSING
BA
TTERY (9120B
only)
Red LED flashes
once/minute
Horn “chirps”
once/minute
Normal Operation
(DC Power – 9120B
only)
Gr
een LED OFF;
Red LED flashes
once/minute
No Audible Alarm
ALARM CONDITION
Smoke Initiating
Device
Red LED flashes
rapidly on the
unit that
trigger
ed the Alarm.
Hor
n pattern:
3 beeps, pause, 3
beeps, pause r
epeat-
ing on all Alarms
ALARM CONDITION
Inter
connect Alarm
Red LED on the
other Alarms in
an interconnected
series will be OFF.
Horn pattern:
3 beeps, pause, 3
beeps, pause repeat-
ing on all Alarms
IN SILENCE MODE
Red LED flashes
once every 10
seconds
Hor
n remains silent
for up to 10 minutes.
Horn will sound if
smoke levels incr
ease.
“LATCHING” ALARM
INDICA
TOR
Green LED ON for
2 seconds/OFF
for 2 seconds,
repeatedly until r
eset,
on initiating unit(s).
Horn remains silent
WHAT TO DO IN CASE OF FIRE
• Don’t panic; stay calm. Follow your family escape plan.
• Get out of the house as quickly as possible. Don’t stop to get dressed or
collect anything.
• Feel doors with the back of your hand before opening them. If a door is
cool, open it slowly. Don’t open a hot door. Keep doors and windows
closed, unless you must escape through them.
• Cover your nose and mouth with a cloth (preferably damp). Take short,
shallow breaths.
• Meet at your planned meeting place outside your home, and do a head
count to make sure everybody got out safely.
• Call the Fire Department as soon as possible from outside. Give your
address, then your name.
• Never go back inside a burning building for any reason.
•
Contact your Fir
e Department for ideas on making your home safer.
Alarms have various limitations. See "Limitations of Smoke Alarms" for
details.
USING THE SILENCE FEA
TURE
The Silence Featur
e on this unit can temporarily quiet an unwanted alarm for
up to 10 minutes.
The Silence Featur
e does not disable the unit—it makes it temporarily
less sensitive to smoke. For your safety, if smoke around the unit is
dense enough to suggest a potentially dangerous situation, the unit will
stay in alarm or may re-alarm quickly. If you do not know the source of
the smoke, do not assume it is an unwanted alarm. Not responding to
an alar
m can r
esult in pr
operty loss, injury, or death. If the unit will not
silence and no heavy smoke is present, or if it stays in silence mode
continuously, it should be replaced immediately.
To silence Smoke Alarms in an interconnected series:
1. To silence multiple alarms in an interconnected series, you must press the
Test/Silence button on the unit(s) that initiated the alarm.
NOTE: The red LED on the initiating alarm will flash rapidly. The red LED
will be Of
f on all other non-initiating alarms. No audible sound will be
hear
d. The unit will exit “silence mode” in appr
oximately 10 minutes.
2.
While the unit is in “silence mode”, pr
essing and holding the T
est/Silence
button for approximately 10 seconds will test the unit. After testing, the
unit will re-enter “silence mode” and the 10-minute timer is reset.