


11
NOTE:
Never push the cable at the T-handle end. Cable may jam and become
inoperable.
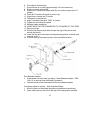
Fixing a jammed cable:
1. Turn the T-handle and threaded metal rod counter clockwise ½ turn until
the jam releases.
2. If necessary, use a pair of pliers to carefully twist the threaded metal rod
until the jam releases.
3. Pull the cable from the “S” hook until the cable returns to an operational
position.
4. Do not connect cable to cylinder at this time.
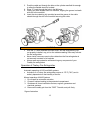
Routing the cable:
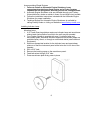
1. Locate the escutcheon plate (2 ½” x 4” with 13/32 hole) for the manual
release handle.
• At the helm station
• On a firm support
• In full view of the operator
• With enough clearance for the cable ferrule to extend approximately
12 inches behind the panel
2. Using the escutcheon plate as a template, locate and drill a 13/32” hole.
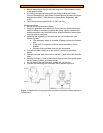
3. Route the cable in the most direct manner, with as few bends as
possible, to the cylinder location.
• Do not bend in a radius of less than 6 inches (a 12 inch circle)
• Follow the same route as manufacturer installed cables, if possible
(Example: Steering, throttle, and transmission cables)
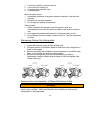
• Do not subject cable to pinching or crushing, rubbing, extreme
vibration, sharp bending or kinking, or extremes of heat or cold
• Do not exceed 360° of bends (Example: Four 90° bends = 4 x 90° =
360°)
• Use the shortest allowable cable whenever possible
• If excess cable must be coiled; do not coil excess cable in the
protected enclosure
4. Secure loose sections of the cable with the included nylon clamps.
• Do not clamp cable in a bend
• Do not crush cable with clamps
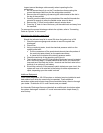
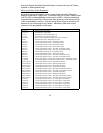
Escutcheon Panel and T-Handle
1. Ensure temperature is above +50°F (10°C) for proper adhesion.
2. Peel the release paper from the back of the escutcheon plate.
3. Align the larger hole with the 13/32 hole drilled in dash.
4. Press escutcheon plate down evenly to activate adhesive.
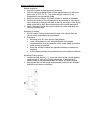
5. Following figure below, place nut and lock washer in place on the cable
end and insert through the 13/32” hole in the panel and escutcheon.