


TOOLS REQUIRED FOR INSTALLATION:
Phillips Screwdriver
Adjustable Wrench
Tape Measure
Pencil
BASIC INSTALLATION INSTRUCTIONS
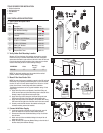
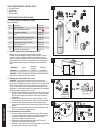
Open Carton & Inspect Parts
Installation Parts
Key Description Part No.
1 QL3 Filter Head EV9270-82
2 PBS-400 Filter Cartridge EV9270-91
3 2 Locking Washers EV3062-04
4 2 Screws EV3061-96
5 3/8" MPT x 3/8" FTP Elbow EV3108-52
6 (2) 3/8" x 1/2" Unions EV3122-51
7 (2) 3/8" x 3/8" Unions EV3122-50
8 Tubing, 3/8" Braided EV3122-49
9 Teflon
®
Tape EV3121-19
10 Everpure Filter Timer EV9075-70
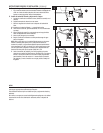
Verify Under-Sink Mounting Location
Measure 20” from the base of the cabinet, and mark the mounting
location for the top of the filter head. Make sure there is adequate
space above the head to open and close the built in shut-off valve and
to avoid crimping the water line tubing. Also, make sure your chosen
location offers easy access for future cartridge changes.
DIMENSION Width
Mounting
Height
Depth
PBS-400 5" 20" 5"
NOTE: The head and cartridge must be mounted in the vertical
position, with the cartridge hanging down.
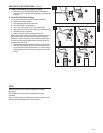
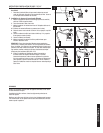
Mount Filter Head Under Sink
NOTE: Two sets of unions are included to connect to the 3/8-inch head
connections. If your existing braided tubing has 1/2-inch connections,
use the 1/2-inch x 3/8-inch unions instead of the 3/8-inch x 3/8-inch
unions. You will have 2 extra fittings with either installation.
The following instructions are for a typical installation using 1/2-inch
supply lines.
Apply Teflon Tape to the small threads of one Union Fitting and
screw into the open end of the Elbow. Wrap tape in direction of the
threads to assure a tight fit and avoid small leaks.
Apply Teflon Tape to the threads of the Elbow Fitting and screw
into the inlet (left) side of the Filter Head. Hand tighten only.
Apply Teflon Tape to the small threads of the second Union Fitting,
and screw into the right side of the filter head in the same manner.
Securely mount the filter head on the cabinet wall using the
enclosed mounting screws and washers.
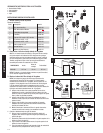
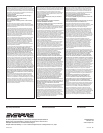
Connect Inlet Water Supply
Locate and close the cold water shut-off valve under your sink.
Open cold water line of faucet to release water pressure.
Unscrew and disconnect the braided tubing on top of cold water
shut-off valve.
Attach one end of the new braided tubing to the top of the cold
water shut-off valve.
Attach the other end of the new Braided Tubing to the inlet side of
the filter head (Union & Elbow Fittings).
•
•
•
•
1.
2.
3.
A.
B.
C.
D.
4.
E.
F.
G.
H.
E
F
G
H
4
D
A
C
B
3
WATER FILTER MONITOR
www.everpure.com
1
1
2
3
4
5
6
7
8
9
10
2
20"
• 2 •
ENGLISH