


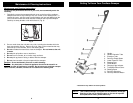

Assembling Your Cordless Sweeper
Your cordless sweeper will require very little assembly. You should remove it from the
carton and familiarize yourself with all the components listed per the exploded view
drawing (page 2). This will help you in the assembly and operation of your cordless
sweeper.
Note: The charging adapter is shipped inside the packaging.
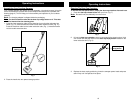
Note: The lower extension tube has the dust cup empty button on it. This tube
should be inserted into the ste
ering pivot.
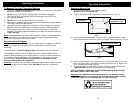
1. Insert the lower extension tube into the steering pivot so that the tab snaps into
place. (Fig. 1a) Push the extension tube into the lower extension tube. (Fig. 1b)
Insert the extension tube into the lower extension tube. (Fig. 1) Insert the handle
into the handle extension tube.
3
Operating Instructions
2. Place the handle into the upward storage position.
Fig. 1
8
Operating Instructions
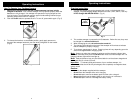
Cleaning The Dust Cup Container
To achieve the best performance, empty the dust cup container after each use.
1. Press the dust cup release button with your foot. (Fig. 7)
Note: Be careful not to accidentally turn the unit on.
2. Lift out the dust cup container, which is connected to the steering pivot. Hold
over a trash bin and push down on the dust cup empty button located on the
lower extension tube. (Fig. 8)
Fig. 7
Dust Cup
Empty Button
Fig. 8
3. Replace the dust cup by positioning it onto the sweeper power head and press
down firmly until it snaps back into place.
Fig. 1a
Fig. 1b
Insert into
steering pivot