


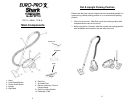
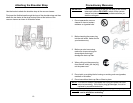


Assembling Your Vacuum Cleaner
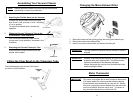
Changing the Micro-Exhaust Filter
NOTE: Always remove the power plug from the wall outlet before
assembling or removing accessories.
1. Attaching the Flexible Hose into the Vacuum
Connect the flexible hose into the air intake
duct. Push in until you hear a “click”, indicating
it is in its position.
To remove the flexible hose, reverse the
operation.
2. Fitting the Chrome Telescopic Tube to the
Curved Wand / Hose Extension
Push the chrome telescopic tube into the
curved wand / hose extension, as shown in the
illustration.
Air Intake Duct
1. Remove the exhaust filter grill by pulling the locking tabs towards you.
2. Remove the used micro-exhaust filter.
3. Insert a new micro-exhaust filter and replace the filter grill.
3. Extending the Chrome Telescopic Tube
Push forward the plastic knob and pull the
smaller tube outward.
IMPORTANT: This filter should be replaced every 6 months or sooner if
required.
Plastic Knob
IMPORTANT: All filters should be checked regularly for signs of damage,
preferable after each cleaning task. The filters must be
replaced immediately if they become damaged.
Always disconnect the vacuum from the electrical outlet
when checking the filters.
Fitting the Floor Brush to the Telescopic Tube
Push the telescopic tube into the Floor brush,
as shown in the illustration.
Motor Thermostat
IMPORTANT: This motor is equipped with a motor protective thermostat.
If for some reason the vacuum cleaner should overheat,
the thermostat will automatically turn the unit off. Should
this occur, unplug the vacuum cleaner from the wall outlet
and turn off switch. Allow the unit to cool. To restart, re-
plug into wall outlet and turn switch back ON.
9
4