


OPERATING INSTRUCTIONS OPERATING INSTRUCTIONS
Using the Soap Injector Care & Maintenance of the Steam
Pocket Towel
Due to the unique cleaning ability of this
cloth, proper care of your microfiber towel is
required to ensure long life and continued
cleaning ability.
• The first thing you should do when you get
a new microfiber towel is to wash and dry
it. During the manufacturing process the
fabric has a tendency to become flat as it
picks up contaminants from the air and
machinery. There will also be a number of
loose threads that, while they cause no
harm, can be annoying the first time you
use the towel.
• To clean the towel, simply wash it in your
washing machine using the warm water
setting.
• Always wash your towels separately from
other fabrics. They have a tendency to
pick up lint and other particles from other
fabrics and the next time you use your
towel, this lint will transfer to the surface
being cleaned.
• ONLY USE LIQUID DETERGENTS, never
use dry detergents as many times the
granules do not fully dissolve and become
trapped in the towel. This can scratch the
surface that you are cleaning.
• NEVER USE BLEACH OR FABRIC
SOFTENERS! Bleach will damage the
microfiber fabric and fabric softeners
deposit a coating on the microfiber fabric
what will not allow the cloth to clean
efficiently.
• Air dry the towel. Do not put in a clothes
dryer as high heat will cause the towel to
shrink and the microfibers to break down.
• If you wash your towel on a regular basis
and don’t let them get too dirty, they will
last much longer. As with any fabric, dirt
particles, grease and other contaminants
can cause the fibers to break down,
therefore regular cleaning will help
preserve your microfiber towels.
• As you use the microfiber towel, you will
notice that sometimes a thread will loosen
or pull out. This is normal and you should
NEVER PULL AT THE LOOSE THREAD!
Pulling the thread can cause the weave to
come undone. Instead, simply trim the
thread with a pair of sharp scissors.
Fig. 20
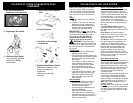
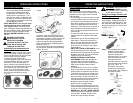
Follow the same procedure as above to
attach the small or the large pad base to
the accessory adapter. Use the small pad
base when using the small scrubbing
pads or sponges or the large pad base
when using the larger scrubbing pads or
sponges. (Fig. 21)
To fix the scrubbing pads and sponges to
the pad bases, press firmly while twisting
slightly. (Fig. 22)
Fig. 21
Fig. 22
WARNING: Always insure the
unit is “UNPLUGGED” from the
wall receptacle prior to attaching
or removing accessories.
Note: The soap solution should only be
used on surfaces that can withstand
the prolonged treatment with high
temperatures and moisture such as
ceramic tiles or counter tops. This
should not be used on materials such
as carpet or wood floors because the
high temperature and steam with soap
can damage the surface.
VERY IMPORTANT: Use only the soap
solution that has been supplied with
your steam cleaner. Use of any other
type of detergent soaps may damage the
pump mechanism and the feed system of
the injector. Regular detergent soaps
SHOULD NEVER BE USED with this
injector.
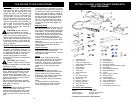
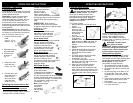
Using Your Steam Cleaner with
the Triangular Brush
To attach the triangular brush to the
angle adapter, hold angle adapter in
your right hand and the brush in your
left. Insert the angle adapter into the
triangular brush and turn 180° to lock
in place. (Fig. 7 )
Fig. 7
WARNING: KEEP SOAP
SOLUTION OUT OF THE
REACH OF CHILDREN.
CAUTION: DO NOT USE THE
SOAP SOLUTION ON ANY
FABRICS OR TEXTILES.
Attaching Soap Accessories to
Adapter
Step 1: The triangle brush w/angle
adaptor connects either
directly to the handgrip or
may be used with the
extension tubes. To connect
the extension tubes to the
hand grip attach the
extension tubes one onto the
other and then onto the hand
grip. (Fig. 8 & 9) To
disconnect, reverse the
operation by pressing the
locking button and pulling the
two sections apart.
Fig. 8
Fig. 9
Your steam cleaner comes with a variety
of scrubbing pads, scrubbing sponges
and a soap brush that can only be used
with the soap accessory adapter.
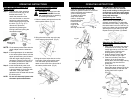
To attach the soap brush to the
accessory adapter, push it into the soap
accessory adapter and turn it counter
clockwise. To lock the soap brush in
place, push the locking button down so
that the pin of the locking button goes into
one of the four (4) holes in the soap
brush. (Fig. 19) To remove the soap
brush, push the locking button up and
turn the brush clockwise to unlock.
(Fig. 20)
Fig. 19
Locking
Button
Locking
Holes
+
=
Locked
10 7