


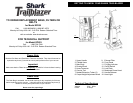

OPERATING INSTRUCTIONS
OPERATING INSTRUCTIONS
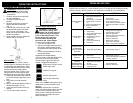
Maintenance & Care
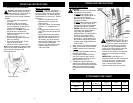
Fig. 4 Fig. 5
Fig. 6 Fig. 7
3. Changing the Filters:
A) This is best done every three
months or depending on the
amount of usage.
B) Remove the front panel of the
vacuum cleaner.
C) The post filter is facing the front
of the unit on the bottom and
the pre-motor filter is located
underneath the bag. To remove
the post motor filter, pull the
locking tab on the right and it
will snap out. To remove the
pre-motor filter, simply slide it
out.
D) To clean the filters rinse in
warm, soapy water. Filters
must by completely air dried for
24 hours before re-installing
into your vacuum.
E) Once filters have been
replaced, replace front panel.
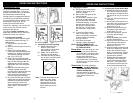
4. Changing the Power Nozzle Belt:
A) Occasionally the power nozzle
drive belt will require changing,
the frequency will depend upon
the amount of use your vacuum
sees.
B) Turn unit “Off” and unplug from
wall outlet.
C) Use a Phillips screwdriver and
remove the two screws from the
back of the motorized power
head cover. (Fig. 9)
D) Remove the two screws from
the bottom of the motorized
power head. (Fig. 10)
E) If the belt has broken, remove
any loose pieces before
replacing.
F) Grasp the beater bar at either
end and lift straight up.
G) Place one end of new belt over
motor shaft and the other on
the round pulley end of the
beater bar. (Fig. 11)
H) Align the rubber supports at the
ends of the beater bar, with the
slots in the motorized power
head. Push into place. Ensure
that the cut-outs on the rubber
supports face upwards.
I) Replace the two screws from
the bottom of the motorized
power head and then replace
the cover. Then replace the
two screws from the back side
of the motorized power head.
For best cleaning results, the dust bag
should be changed often. The use of
powder carpet fresheners can decrease
the effectiveness of the dust bag
filtering system by clogging the bag and
not allowing air to flow though properly.
We recommend that hard objects, pins,
broken glass, paper clips, etc. be
picked up from the floor before
vacuuming. Although, your vacuum will
pick them up, they could do severe
damage to the vacuum.
Use genuine Shark Trailblazer dust
bags, belts and filters only to insure top
performance from your vacuum.
1. Changing the Dust Bag:
Your vacuum comes with both paper
bags and a reusable cloth bag. To
change bags:
A) Unplug power cord from wall
outlet.
B) Remove the front panel of the unit.
(Fig. 4)
C) Remove the old dust bag by
holding the cardboard tab and pull
towards you. Remove carefully to
avoid dust/dirt spilling from dust
bag. (Fig. 5 & Fig. 6))
D) Take a new dust bag and while
holding the cardboard tab push the
bag over the opening of the dirt
discharge tube until it is seated
against the rear of the enclosure.
(Fig. 7)
E) Make sure that the entire bag is
correctly inserted inside the
housing, before replacing the front
panel. Always check the pre-
motor and post motor filters every
time you change the dust bag.
F) Once the new dust bag is in place,
replace the front panel by aligning
the bottom locking tabs with the
slots in the body, close cover
slowly allowing the front panel to
snap in place. The latch will
self lock.
NOTE: DO NOT OPERATE THE
VACUUM WITHOUT ALL THE
FILTERS IN PLACE.
2. Emptying the Cloth Dust Bag:
A) Hold the dust bag over a
dustbin. Remove the
clip by sliding it off the dust
bag sideways. (Fig. 8)
B) Shake the contents of the
dust bag into the dustbin.
C) Close the dust bag by sliding
the clip back onto the bottom
edge of the dust bag.
Please Note: If you are using the cloth
dust bag, you should wash the
pre-motor filter in lukewarm water
once or twice a year. Always let
the pre-motor filter air dry
completely for 24 hours. Make
sure that the filter is completely
dry before you put it back into the
vacuum cleaner.
Please Note: The cloth dust bag is
washable. DO NOT WASH IN
WASHING MACHINE. AIR DRY
FOR 24 HOURS ONLY. It
should however be replaced
every three (3) months to ensure
peak performance of your
vacuum.
Fig. 8
Note: The Cloth Dust Bag may be
washed in warm, soapy
water. Always allow the
cloth dust bag to air dry
completely for 24 hours
before replacing into the
vacuum.
Fig. 9 Fig. 10
Fig. 11
5
6