


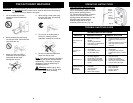

OPERATING INSTRUCTIONS OPERATING INSTRUCTIONS
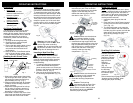
Connecting the power nozzle to the
telescopic tube:
• Depress the button on the telescopic
tube and insert it into the slot on the
power nozzle elbow.
• Push the telescopic tube down until
you hear a "click". (Fig. 5)
Extending the Chrome Telescopic
Tube
• Push forward on the
plastic button and
pull the inner
chrome tube
outward. (Fig. 3)
Power cord
receptacle
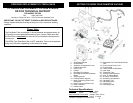
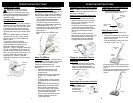
Assembling Your Vacuum Cleaner
Note: Always remove the power plug
from the wall outlet before assembling or
removing accessories.
4
Fitting the Floor to Carpet Brush
to the Telescopic Tube
• Push the telescopic tube into the
floor brush as show in Fig. 4.
Telescopic
Tube
Floor to Carpet
Nozzle
Fitting the Telescopic Tube to
the Curved Wand / Hose
Extension
• Push the extension tube into the
curved wand / hose extension, as
shown in the illustration below.
Make sure that the extension tube
locks in place. (Fig. 2)
Plastic
Button
Attaching the Flexible Hose into
the Vacuum
• Connect the flexible hose into the
flexible hose inlet. Push in until you
hear a “click”, indicating it is in its
locked position. (Fig 1)
• Connect the hose connecting power
cord from the flexible hose to the
power cord receptacle that is on the
unit just underneath the handle.
(Fig. 1)
• To remove the flexible hose first
remove the power nozzle power cord
from the receptacle for the power
nozzle power cord, then depress
locking button and remove hose.
• Insert the power nozzle cord plug into
the power socket on the flexible hose.
(Fig. 6)
• To start power nozzle press the On/Off
button that is located on the power
nozzle.
Using Power Nozzle
Telescopic
Tube
Power
Nozzle
Fig. 1
Fig. 2
Fig. 4
Fig. 5
Fig. 6
Fig. 3
Important: This unit is equipped with a
motor protective thermostat. If for some
reason the vacuum cleaner should
overheat, the thermostat will
automatically turn the unit off. Should
this occur:
• Push the On/Off button once.
• Disconnect the plug from the
power source.
• Check the source of overheating
problem. (i.e. clogged hose or
filter)
• If clogged hose or filter is found,
unclog the hose and replace the
filters.
• Wait at least 45 minutes before
attempting to reuse the vacuum.
• After unit has cooled down for
45 minutes, plug in the cleaner
and push the On/Off button. The
vacuum should start again.
• If the vacuum still does not start,
contact customer service at
1 (800) 798-7398.
Motor Thermostat
Replacing the Filters
Changing & Cleaning the
Pre-Motor Filter
Your vacuum is equipped with a filtration
system to reduce dust and pollen in your
home as you clean. The pre-motor filter
is located inside the vacuum cleaner
body behind the dust bag. Check when
changing the dust bag and replace when
dirty.
This is a rinseable filter but should be
replaced every six (6) months. Never
operate the vacuum without ALL the
filters in place
To remove, open the dust bag
compartment cover and pull the pre-
motor assembly out of the vacuum.
Remove the filter from the filter
assembly. Rinse in lukewarm water and
let it air dry completely for 24 hours. Do
not use a washing machine to rinse the
filter. Do not use a hair dryer to dry it. Air
dry only. When the pre-motor filter is
completely dry, insert it in the filter
assembly and replace it into the vacuum.
(Fig. 16)
Pre-Motor
Filter
Warning: To reduce the risk of
electric shock, the hose, power
nozzle power cord and the power cord
must be disconnected before changing
the bag or performing maintenance/
troubleshooting.
Fig. 16
Changing & Cleaning the HEPA-
Type Post Motor Filter
The HEPA-Type post motor filter should
be replaced every six (6) months
depending on usage. Never operate the
vacuum without ALL the filters in place.
• Push the Power On/Off button to the
"Off" position and disconnect the
power cord from the wall outlet.
• The HEPA-Type post motor filter is
located just underneath the dust bag
compartment cover. (Fig. 17)
• Hold the HEPA-Type post motor filter
assembly by the tab and pull the
assembly out.
• Replace with a new HEPA-Type
filter.
HEPA-Type Post Motor
Filter
Fig. 17
7