


3. Changing the Filters:
A) This is best done every three months or depending on the amount
of usage.
B) Remove the front panel of the vacuum cleaner.
C) The post filter is facing the front of the unit on the bottom and the
pre-motor filter is located underneath the bag. To remove the post
motor filter, pull the locking tab on the right and it will snap out. To
remove the pre-motor filter, simply slide it out.
D) To clean the filters rinse in warm, soapy water. Filters must
by completely dry before re-installing into your vacuum.
E) Once filters have been replaced, replace front panel.
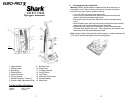
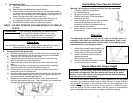
Assembling Your Vacuum Cleaner
Warning: Do not plug in vacuum unit until it is fully assembled.
1. Carefully unpack all components,
set aside packaging.
2. Lift vacuum body to upright position.
3. Remove the screws (2) that are already
attached to the body.
4. From the rear of the vacuum, align the handle
with groove and slide onto vacuum. If
necessary, use thumb and finger pressure
to slide handle into position.
5. Once handle is in place, attach the handle with
the screws (2).
NOTE: DO NOT OPERATE VACUUM WITHOUT FILTERS IN
PLACE.
Please Note: If you are using the cloth bag, you should wash the
pre-motor filter in lukewarm water once or twice
a year. Make sure that the filter is completely dry
before you put it back into the vacuum cleaner.
Operation
Please Note:
The Cloth Bag is washable. It should however be replaced every three (3)
months to ensure peak performance of your vacuum.
1. Adjust the motorized power head for the
correct carpet height from low to high.
2. Plug power cord into electrical outlet.
3. Step on the handle release button to
release the handle.
(See illustration at right)
4. Press the On/Off button to the On position.
5. You are now ready to vacuum.
The lightweight upright vacuum can be used on multiple types of
carpeting, bare floors or upholstery with attachments. When using
the attachment tools such as the crevice nozzle or the dusting brush,
place the handle in the upright position.
4. Changing the Power Nozzle Belt:
A) Occasionally the power nozzle drive belt will require changing, the
frequency will depend upon the amount of use your vacuum sees.
B) Turn unit “Off” and unplug from wall outlet.
C) Use a Phillips screwdriver and remove the two screws from the
back of the motorized power head cover.
D) Remove the two screws from the bottom of the motorized power
head.
E) If the belt has broken, remove any loose pieces before replacing.
F) Grasp the beater bar at either end and lift straight up.
G) Place one end of new belt over motor shaft and the other on the
round pulley end of the beater bar.
H) Align the rubber supports at the ends of the beater bar, with the slots
in the motorized power head. Push into place. Ensure that the cut-
outs on the rubber supports face upwards.
I) Replace the two screws from the bottom of the motorized power
head and then replace the cover. Then replace the two screws from
the back side of the motorized power head.
5
2
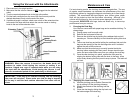
How to Adjust for Carpet Height
WARNING: To avoid injury, keep loose clothing, hair, fingers and all
other parts of body away from any moving part (such as the beater
brush). Turn off the switch and unplug the vacuum before adjusting
the vacuum for the carpet height.
The front of the vacuum cleaner has a carpet adjustment knob that raises
and lowers the motorized power head to match the type of carpet. With the
vacuum NOT
connected to the electrical outlet, set the adjustment to the
lowest setting for maximum cleaning. If the vacuum is to difficult to push,
move the knob to the next highest setting until the vacuum is comfortable to
push. The beater brush must reach the carpet for effective cleaning.