


Fig. 5
4
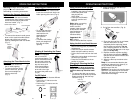
OPERATING INSTRUCTIONS
Warning: Always remove the power
plug from the wall outlet before
assembling or removing accessories.
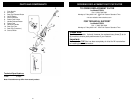
Inserting the Vacuum Handle into
the Hand Vac
• Push down on the vacuum handle
release button then insert the vacuum
handle into the opening above the
hand vac handle. (Fig. 1)
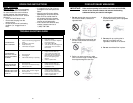
Attaching the Floor Nozzle to the
Hand Vac
• Insert the floor brush into
the air intake opening.
• To remove the floor nozzle
from the hand vac, pull the
floor nozzle straight out
from the hand vac.
(Fig. 3)
Attaching the Crevice Brush to
the Hand Vac
• Hold the end of the crevice brush.
Insert the crevice brush into the air
intake opening of the unit. (Fig. 4)
Fig. 3
Fig. 1
Fig. 4
• To remove the vacuum handle, press
down on the vacuum handle release
button and pull the pole up while
securely holding the hand vac handle.
(Fig. 2)
Fig. 2
Handle Release Button
Vacuum Handle
Vacuum
Handle
Release
Button
Winding & Unwinding the Power
Cord
This unit is equipped
with a convenient
cord storage feature. The
power cord winds around
the two cord holders at
the back of the unit. The
top one has a quick
cord release feature.
Turn the cord holder
to the left or the right
to remove the power cord.
(Fig. 6)
On/Off Switch
• The On/Off switch has two different
positions.
• Push on the "I" side to turn the
vacuum ON.
• Push on the "O" side to turn the
vacuum OFF.
= OFF
= ON
Fig. 6
5
OPERATING INSTRUCTIONS
Using the Unit as a Hand Vacuum
• Ensure that the unit is unplugged
before removing parts, or performing
maintenance.
• Press the vacuum handle release
button and pull handle to remove.
• Pull the floor nozzle out from the hand
vac.
• Attach the crevice brush to the end of
the hand vac if desired.
• Press the On/Off switch to the on
position to vacuum.
Using the Unit as an Upright
• Ensure that the dust cup filter is
installed in the dust cup container.
• Unwind the power cord
and plug into the
120V outlet.
• Press the On/Off switch
to the On position and
vacuum.
L
o
w
e
r
Note: When vacuuming
deep pile carpets or
hard to vacuum
carpets, lower the angle
of the vacuum handle
(see illustration at
right) for easier
maneuverability.
Important: Do
NOT use the
vacuum without the filter in place.
Dust Cup
Release Button
Fig. 7
Changing & Cleaning the Dust
Cup Filter
To achieve the best performance,
empty the dust cup container and
clean the dust cup filter after each
use.
1. To remove the dust cup container,
press down on the dust cup release
button and pull off the dust cup
container. (Fig. 7)
2. Empty the dust from the dust cup
container. (Fig. 8)
3. Pull off the dust cup filter. (Fig. 9)
Fig. 8
Fig. 9
4. Rinse the dust cup filter in cold water,
and then wait until it air dries
completely before replacing it back
into the dust cup container. Do not
use a washing machine to clean the
dust cup filter. Do not use a hair dryer
to dry it. Air dry only.
5. Replace the dust cup filter carefully
into the dust cup container. NEVER
operate vacuum cleaner without dust
cup filter in place.
6. Attach the dust cup container to the
vacuum.
Note: It is recommended that the dust
cup filter be replaced every three (3) to
six (6) months to ensure peak
performance of the unit.
Caution: The suction hole must be open
and free of any obstructions at all times.
Otherwise, the motor will overheat and
could become damaged.
• For a longer reach the
crevice brush can be
used with the unit
assembled as a
stick vacuum.
(Fig. 5)
• To remove the dusting
brush pull straight out
from the air intake
opening.