


OPERATING INSTRUCTIONS
WARNING: Always remove the power
plug from the wall outlet before
assembling or removing accessories.
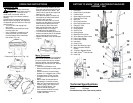
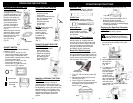
ATTACHING THE FLOOR BRUSH
TO THE MAIN UNIT
• Insert the floor brush into its location at
the bottom of the main unit, in the
direction of the arrow. (Fig. 2)
• Make sure that the floor brush is firmly
inserted into the floor brush socket.
• Insert the inlet hose into the floor brush
hose connector that is on the floor
brush. (Fig. 3)
• To remove the floor brush from the
main unit, press on the floor brush
release button and pull the floor brush
out.
ATTACHING THE HOSE TO THE
MAIN UNIT
• Hold the end of the removable hose
handle and insert it into the hose
connector. (Fig. 3)
4
Fig. 2
Floor Brush
Hose Connector
Hose
Connector
Fig. 3
Floor Brush
Hose Connector
Inlet
Hose
OPERATING INSTRUCTIONS
7
Inserting the Handle Into the Main
Unit
• Insert the handle into the hole on the
top of the unit. Make sure that the slot
in the handle fits correctly into the
opening. (Fig. 1)
• Insert the sleeve nut into the unit first.
Then holding the sleeve nut with your
thumb, insert the bolt. Using a flat
screw driver, secure the bolt to the
sleeve nut. (Fig. 1)
• To remove the
handle, you have
to remove the
bolt and the
sleeve nut.
Fig. 1
Sleeve nut
Bolt
3. Remove the HEPA
filter from the debris
screen. Remove the
filter ring that is
around the HEPA
filter. Then
vigorously “TapClean” the HEPA
Filter on a hard surface until no
more dust is observed falling out.
4. To clean the debris
screen, we
recommend that
you rinse it under
lukewarm running
water to remove
the dirt that
accumulates
on it, but always
allow 24 hours to air dry before
inserting back into the vacuum.
5. To re-assemble the filter
assembly, insert the filter ring over
the HEPA filter and then insert the
HEPA filter assembly into the
debris screen. Insert the debris
screen into the filter cover.
Replace the filter assembly into
the dust cup.
Cleaning the HEPA Filter and the
Debris Screen
WARNING: After each Use -
Always remove the Filter
Assembly, then vigorously “TapClean”
HEPA Filter and clean Debris Screen
until no more dust can be removed.
IMPORTANT
, Please Note: The
“TapClean” HEPA Filter will stop most of
the tiniest dust particles and airborne
allergens from re-entering the air you
breathe. Because of this incredible
filtration performance, the HEPA Filter
will quickly accumulate, inside the white
filter folds, many fine dust particles that
are difficult to see but which will
eventually block or reduce your suction
power - if not cleaned properly.
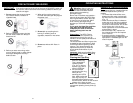
1. To remove the filter assembly from
the dust cup, hold the dust cup from
the handle in one hand and with the
other hand, turn counter clockwise
and pull out the filter cover. (Fig. 14)
Fig. 14
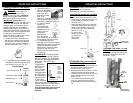
2. To separate the filter assembly, hold
the bottom of the debris screen and
pull the filter cover out. (Fig. 15)
Wash
once a
month or
when
suction
appears
reduced
Warning: Allow 24
hours for drying before
replacing in unit.
Fig. A
PLEASE NOTE: The white pleated
filter material in the HEPA Filter will
discolor over time -This is NORMAL
and will NOT affect the performance
of the filter. If the HEPA Filter
is properly
"TapCleaned”
after each use
and suction
does not return
to 100%, then
we suggest that
the HEPA filter
be “TapCleaned”
vigorously until
no more dust
can be removed,
then rinsed under the faucet and
allowed to air dry for 24 hours before
refitting into the vacuum. (Fig. A)
This should be done once a month
or when suction appears to be
reduced .
Filter Cover
HEPA Filter
Debris Screen
HEPA Filter Ring
Filter Assembly
Fig. 15