


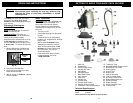

OPERATING INSTRUCTIONS
Assembling Your Vacuum
Cleaner
Note: Always remove the power plug
from the wall outlet before assembling
or removing accessories.
Inserting the HEPA Dust Bag
Note: This unit can be used with the
shake-out bag alone, however it must
be cleaned after every use if there is
no HEPA dust bag installed.
Important:DO NOTuse the vacuum
without all filters, shake-out bag, and
with or without HEPA dust bag in place.
1. Unplug the hose connecting power
cord and remove the flexible hose.
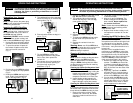
2. To open the canister lid press on
the canister lid tabs on each side
of the unit and lift canister lid.
(Fig. 1)
4
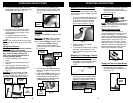
6. Ensure that the shake-out bag is in
place. (Fig. 4)
3. Pull the tab on the HEPA dust bag
holder out slightly and flip upwards.
(Fig 2)
4. Holding the HEPA dust bag in your
hand, slide it firmly between the
slots in the bag holder. (Fig 2)
Fig. 3
7. Flip the HEPA bag holder over,
pressing the tab on the bag holder
until it clicks, then replace the
canister lid.
8. The canister lid can be replaced on
the unit with the hose opening on
the right or left, as per your
preference. (Fig. 5)
Shake-Out
Bag
Canister Lip
Fig. 4
5. The cardboard face of the new bag
should rest securely in the dust bag
cover guides. (Fig. 3)
Fig. 1
Canister
Lid
Tabs
Canister
Lid
Tabs
Fig. 2
Tab
Fig. 5
Left-Handed
Placement
Right-Handed
Placement
Warning: To reduce the risk of electric shock, the power cord must be
disconnected before removing the dust bag, shake-out bag,
changing the filters or performing maintenance or trouble-
shooting checks.
OPERATING INSTRUCTIONS
Cleaning & Replacing the Shake-
Out Bag
Note: Clean the shake-out bag out-doors
when changing the HEPA dust bag.
Optimum performance is achieved by
using the HEPA dust bag with the shake-
out bag decreasing the need for washing
the shake-out bag.
Cleaning the Shake-Out Bag when Used
with the HEPA Dust Bag:
1. Remove the shake-out bag, holding the
handle at the bottom of the bag, shake
outdoors vigorously over a garbage
receptacle until there is no more dust.
2. Inspect shake-out bag regularly for
tears or damage. Replace shake-out
bags if damage or tears are present.
Cleaning the Shake-Out Bag when Used
Alone:
It is recommended that the shake-out bag
be washed after it has been used several
times without the HEPA dust bag in place.
1. Remove the shake-out bag, empty
contents into a trash can, and shake
vigorously outdoors until there is no
more dust.
Cleaning the HEPA Pre-Motor Filter
Important, Please Note: The HEPA
pre-motor filter will stop most of the tiniest
dust particles and airborne allergens from
re-entering the air you breathe. In fact it
stops 99.97% of all particles as small as
0.3 microns - many times smaller than a
human hair!
Because of this incredible filtration
performance, the HEPA pre-motor filter
will accumulate many fine dust particles
that are difficult to see. Be assured that
the HEPA pre-motor filter is doing the job.
Clean the HEPA pre-motor filter after
each use as described in this section.
1. Remove the shake-out bag from the
canister. The HEPA pre-motor filter
is located underneath the shake-out
bag. To remove the HEPA pre-motor
filter, lift the filter from the sides of the
HEPA filter.
2. Vigorously “TapClean” the HEPA
pre-motor filter on a hard surface to
remove any residual dust that might
still be on the HEPA pre-motor filter.
3. You can wash the HEPA pre-motor
filter by running it under the tap and
allowing the water to run on the dirty
side at least once a month or when
suction appears to be decreased.
Wash once a month
or when suction
appears reduced
Warning: Allow 24 hours
for drying before replacing
in unit.
9
Warning: To reduce the risk of electric shock, the power cord must be
disconnected before removing the dust bag, shake-out bag, changing
the filters or performing maintenance or trouble-shooting checks.
4. Replace the HEPA dust bag with a new
bag. Do not reuse the same bag.
5. The cardboard face of the new bag
should rest securely in the dust bag
cover guides. (Fig. 24)
6. Replace the shake-out bag into the
vacuum.
7. To replace the HEPA dust bag holder,
flip the holder and press tab until it
clicks.
8. Replace the canister lid onto the
vacuum.
Warning: Never over fill the HEPA dust
bag – replace when bag is full and clean the
shake-out bag and filter each time the
HEPA dust bag is replaced.
Fig. 24
Tab
2. The shake-out bag is hand washable
in lukewarm water.
3. Allow to air dry for 24 hours. The
shake-out bag should be replaced
when needed. Never replace into
the vacuum if still wet.
Note: If used often without HEPA dust
bag, replacement and washing will be
required more often.
4. Replace clean shake-out bag in unit,
and replace the canister lid onto the
vacuum.