


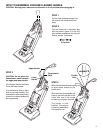
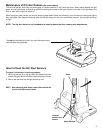

HOW TO ASSEMBLE VACUUM CLEANER HANDLE
CAUTION: Moving parts, make sure on/off switch is in off position before plugging in.
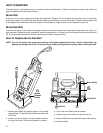
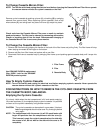
STEP 1
Pull the foam protector pieces from
the ends of the handle and throw
away.
STEP 2
Find the 2-part bolt in the plastic bag
with the owner’s guide. It is the only
part needed to assemble the vacuum
cleaner handle. See below.
2-Part Bolt
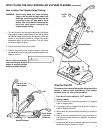
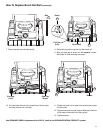
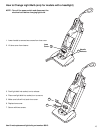
STEP 3
CAUTION: Do not pinch the
transmission cable between
the upper and lower handle.
Lift the upper handle and place
it over the lower handle.
Line the holes up (one on each
side of the lower handle). The
transmission cable should stay
in place in the lower handle tube
during assembly.
Lower
Handle
Upper Handle
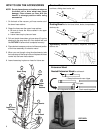
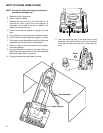
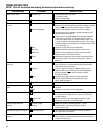
STEP 4
Move flexible hose off hose hook
to allow easier access to the
handle area.
While the holes in the handle are
lined up, put the 2-part bolt in the
holes and use a flat blade
screwdriver to tighten securely.
The handle is now
installed. The vacuum
is now fully assembled
and ready for use.
Flexible
Hose
Transmission
Cable
5