Limited Warranty
This warranty is extended to the original purchaser of an evaporative cooler installed and used under nor-
mal conditions. It does not cover damages incurred through accident, neglect, or abuse by the owner. We
do not authorize any person or representative to assume for us any other or different liability in connection
with this product.
Terms And Conditions Of The Warranty
For One Year from date of purchase, we will replace any original component provided by Champion
Cooler which fails due to any defect in material or factory workmanship only.
Exclusions From The Warranty
We are not responsible for replacement of evaporative media. These are disposable components and
should be replaced periodically. We are not responsible for any incidental or consequential damage result-
ing from any malfunction.
We are not responsible for any damage received from the use of water softeners, chemicals, de-scale mate-
rial or plastic wrap.
We are not responsible for the cost of service calls to diagnose the cause of trouble, or labor charge to
repair and/or replace parts.
How To Obtain Service Under This Warranty
Contact the Dealer where you purchased the evaporative cooler. If for any reason you are not satisfi ed
with the response from the dealer, contact the Customer Service Department: Champion Cooler, 5800
Murray Street, Little Rock, Arkansas 72209. 1-800-643-8341. info@championcooler.com
This limited warranty applies to the original purchaser only.
Register your product online at www.championcooler.com/eac/onlineregistration-eac.htm
Maintenance
WARNING: Before doing any maintenance be sure unit is unplugged.
Drain Unit
To drain the unit, remove the media frame and remove the rubber drain stopper from the bottom of the unit
by pulling it out of the drain hole. The unit should be drained periodically to keep the water fresh. We
recommend draining the unit once a week. Drain the water from the unit when it will not be used for an
extended period.
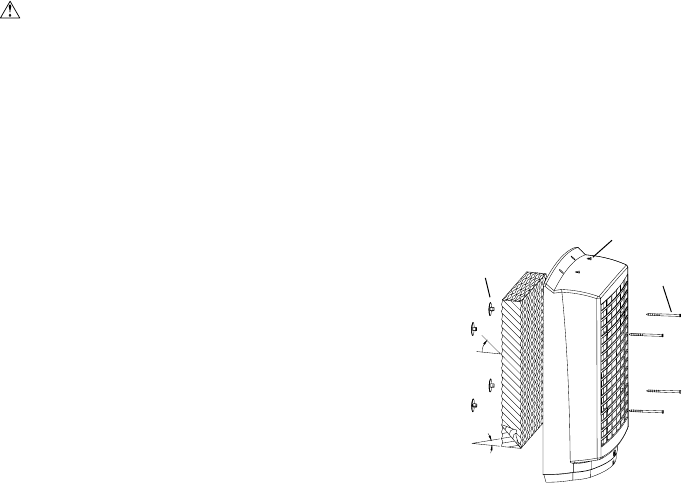
Note: To remove the media frame, fi rst remove the two screws located at the top of the frame (see
fi g. 4). Tilt the frame back while pressing on the bottom of the frame where it says “Push” until it
snaps out, then lift out. The water distribution hose can be removed from the media frame to allow
complete separation of media frame from unit. Do not operate unit with media frame removed.
Clean/Replace Evaporative Media
The evaporative media should be cleaned twice a season or when
needed. To clean the media, rinse with clean water. Light scrub-
bing might be necessary. Be careful not to damage media. After
2 years, or when it becomes clogged, the media will need to be
replaced. To remove the media, fi rst remove the keeper disks from
the keeper stems (see fi g. 4). Remove the keeper stems from the
media and remove the media.
When replacing the evaporative media, install it so that the steeper
fl ute angle of the media is sloping down towards the media frame
(see fi g. 4). Push the keeper stems through the media from the
back of the media frame and press the keeper disks onto the stems
to secure the media in place.
3
Keeper
Disk
Keeper
Stem
Fig. 4
45°
15°
Screw


