


Cooler Installation
Install Pedestal and Casters
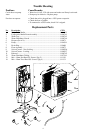
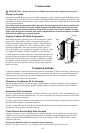
Unpack the unit and remove the media frame to access the pedestal and 4 cast-
ers. See the maintenance section for instructions on removing media frame.
CAUTION: Do not damage hose connecting pump to media frame. Cut
the cable ties holding pedestal to frame of unit and remove pedestal. Remove
the casters from the underside of the pedestal. To install the pedestal, turn the
unit on it’s side. Line up the bosses on the pedestal to the bosses on the base
of the unit (see fi g. 1). Use the four provided screws to attach the pedestal
to the base of unit. Press the stem casters into each corner hole of pedestal,
installing the 2 locking casters on the front and the 2 non-locking on the back
side.
Operation
Fill With Water
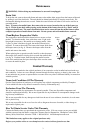
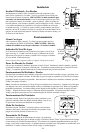
To fi ll this unit with water, open the water fi ll door and fi ll with a
pitcher or water hose (see fi g. 2). Do Not Overfi ll. CAUTION:
Take care when moving unit fi lled with water, spillage may
occur. Unlock casters when moving. Do not tip unit.
Water Level Indicator
On the front of the unit there is an access window to view the
level of the water (see fi g. 2). When the unit is full of water, the
level indicator will be at the top of the window and as the level
of the water is decreased in the unit, the indicator will lower.
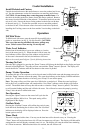
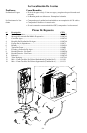
Refer to the control panel in fi gure 3 for the following instructions.
Turning On Unit
Once the unit is plugged in, pressing the “Power” button will light up the backlight on the display and start
the unit in Fan-High mode. The pump will not start until the “Pump” button is pressed. The display will
remain backlit for 2 minutes after the last button on the control is pushed.
Pump / Cooler Operation
To operate this unit as an evaporative cooler, the unit must be fi lled with water and the pump powered on.
Press the “Pump” button to turn on the pump. The water drop indicator on the display will fl ash while the
pump is on. To operate the unit as a fan only, press “Pump” to turn off the pump.
Note: The pump will not run if the water level falls below a certain level. When the water level drops
below this level, an audible alarm will sound and the “Low Water” indicator on the display will fl ash on
and off. The audible alarm will stop after 60 seconds or when the “Pump” button is pushed. The indica-
tor will remain fl ashing until the unit is fi lled with water. You will need to restart the pump by pressing
“Pump” after the unit is refi lled with water.
Fan Operation
Pressing the “Speed” button on the control will cycle the fan
speed from High to Mid to Low. The speed setting will be
highlighted in the display.
Oscillate Mode
Pressing the “Oscillate” button will oscillate the vertical vanes
back and forth, distributing the air side to side. The “Oscillate”
indicator on the display will be displayed when on. Press the
button again to turn off.
Timer Mode
This unit is equipped with a timer. You may set the time interval for the unit to stay on. Pressing the
“Timer” button will set the time interval in 1/2 hour increments up to 8 hours. The display will fl ash while
setting the time and will display constantly once it is set. The display will count down the time remaining
in 1/2 hour increments. When the time interval is reached, the unit will turn off.
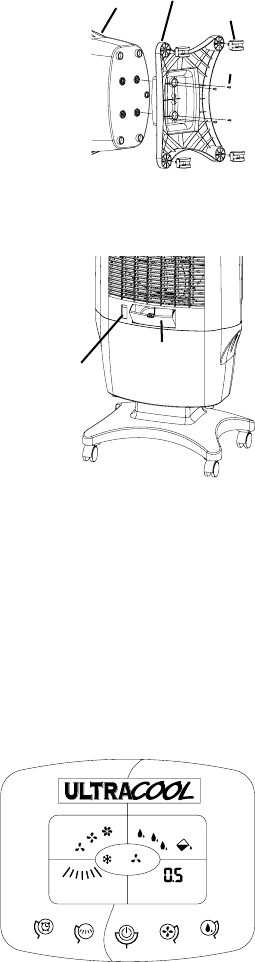
FAN PUMP
TIMER
OSCILLATE
LOW
MID
HIGH
COOL VENT
LOWWATER
hr
Oscillate
Timer
Power
Speed
Pump
Fig. 3
2
Water
Fill
Door
Water Level
Indicator
Fig. 2
Caster
Pedestal
Base
Fig. 1
Screw