


4
110498-3
Maintenance
WARNING: Before doing any maintenance be sure power
is off. At the time you remove either inspection panel be sure to
unplug motor and pumps. This is for your safety.
Spring Start-Up
• Clean pads. A clean pad is more absorbent, effi cient and will give
more cool air. Annually, or when required, using a garden hose
with nozzle, back wash to clean out the openings, then clean off
the inlet face any scale or other obstruction to the passages. Slight
scraping may be required to remove hardened scale.
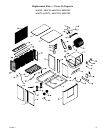
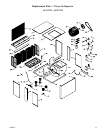
• Change pads if necessary. The pads should be replaced after 5
years or if necessary. To change pads, remove top access panel,
remove grill, and disconnect water delivery tube. Remove water
distributor holder and lift out media sections. Replace with the
same type media. You can purchase them from your dealer.
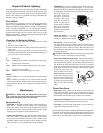
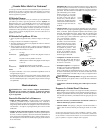
IMPORTANT: In order to get the best performance from your
cooling pads, they must be installed properly. If you have pur-
chased a pad with two equal angles, the following instructions can
be disregarded. Pads must always be installed with the steeper
fl ute angle sloping down
towards the air entering
side (Fig. 7). The reason
is simple. The steeper
angle puts more water on
the hot, dry, dirty side of
the pad where it is needed
most. It also counteracts
the tendency of the air to
push the water toward the
back of the pad.
• Check belt tension. A 3 lb. force
should defl ect the belt 3/4 inches
(see Fig. 8). Readjust belt if needed.
• Oil bearings. The blower bearings
and cooler motor in this unit should be oiled with a few drops of
non-detergent 20/30 weight oil once each year. The motor does
not need oil if it has no oil lines for oiling. Motors that have no oil
lines are lifetime oiled at the factory and require no further oiling
for the life of the unit.
CAUTION: Do not over oil. Over oiling can cause motor burn
out, due to excessive oil getting into motor winding.
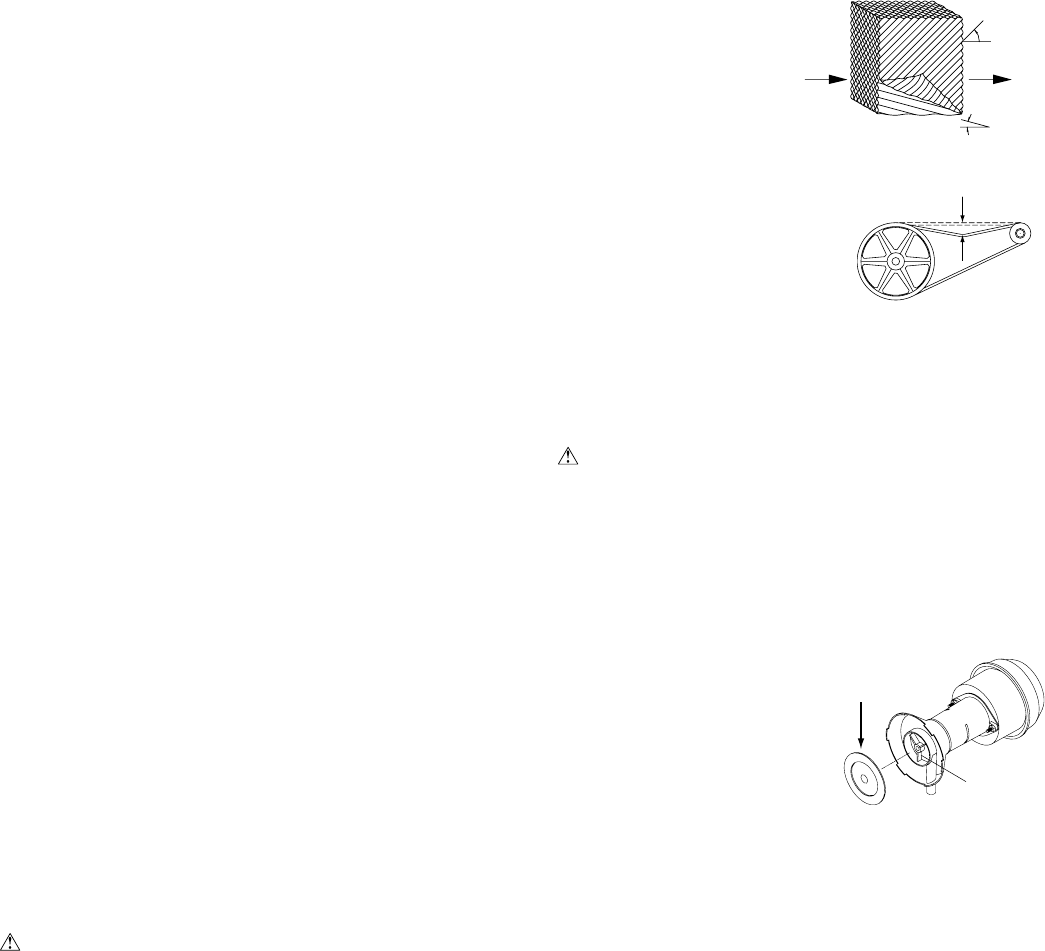
• Clean water pump and dump pump. Cleaning both pumps is
necessary once a year at start-up. For your safety, turn unit off
and unplug motor and pumps. Remove the pump from the mount
slot. Remove the base of the pump as shown in Fig. 9. Clean the
pump and turn the impeller to ensure free operation. Remove the
pump spout and check for any blockage. After cleaning, reinstall
the base onto the pump. Press
fi rmly to make sure it is secure.
Reattach the pump to the mount
in the cooler using the plastic
retainer to ensure that the pump
will not overturn. Do not forget
to replace the spout and water
delivery tube onto the pump
outlet.
Winter Shut-Down
• Drain water. Always drain all of the water out of the cooler and
water supply line when not in use for prolonged periods, and par-
ticularly at the end of the season. Keep the water line disconnected
from both the unit and water supply so that it does not freeze.
• Unplug motor and pumps. When cooler is not used for extended
periods unplug the motor and pumps from inside cooler.
• Cover unit. To protect the life of the fi nish, a cover for the unit is
suggested in extended periods of non use.
By following the operating, installation, and maintenance suggestions
as outlined, you can get many years of efficient and satisfactory service
from your cooler. In the event additional information is desired, your
dealer will be more than glad to assist you in every possible way.
Required Exhaust Openings
An often misunderstood concept of evaporative cooling is the amount
of air that should be exhausted. How much should you open your
windows? The fact is that most people do not open their windows
enough. The following two methods will help you determine the
amount to open your windows.
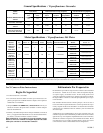
First Method
You should allow an opening of at least 2 square feet (288 square
inches) for each 1000 CFM rating of your unit. Example: At 3790
CFM, model AD1C51 (3/4 hp) requires 7.6 square feet (1094 square
inches) of opening (3790/1000 * 2 = 7.6). Multiply the number of
windows by window width in inches and divide this into the number
of square inches required for your size unit. This will give you the
height to open windows. In this example, four 36 inch wide windows
should be opened 7.6 inches each.
Champion Air Balancing Method
1. Take a piece of tissue paper and cut it lengthwise into 3 equal
strips.
2. Turn your cooler on high cool.
3. Open one window at least six inches wide in each room that you
want to cool.
4. Take the piece of tissue paper and put it up against the screen of
the open window furthest from the cooler discharge opening. Let
go of it. It will do one of three things.
IF It falls down.
THEN CLOSE all of the windows one inch and try step 4 again.
IF It plasters itself to the screen.
THEN OPEN all of the windows one inch and try step 4 again.
IF It stays on the screen lightly.
THEN PERFECT. You are done. Enjoy your cooler.
NOTES:
• When switching to low cool, you must rebalance your home. Repeat
step 4.
• Once you balance your home you can cool some areas more than
others by opening those windows more and closing the others by
the same amount. Repeat step 4 to make sure your home is still air
balanced.
45°
15°
Entering
Air
Leaving Air
Fig. 7
Fig. 8
3 Lb.
3/4 Inches
Impeller
Remove
Base
Fig. 9