


3
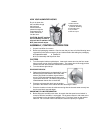
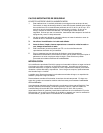
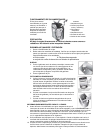
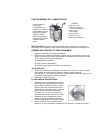
HOW YOUR HUMIDIFIER WORKS
CAUTION: Do NOT position
the unit directly in front of
a hot air duct or radiator. Do
NOT place on soft carpet.
ASSEMBLY, CONTROLS & OPERATION
1. Unpack humidifier from carton.
2. Remove all packaging materials. Check to see that you have all of the following items
removed from the boxes accessory kit and cabinet before discarding the packaging:
♦ Evaporative wick ♦ Caster kit
♦ Lift rod assembly with Styrofoam float
CASTERS
3. Turn the emptied cabinet upside down. Insert each caster stem into the four caster
holes on each corner of the humidifier bottom. The casters should fit snugly and be
inserted until the stem shoulder reaches the cabinet surface.
4. Turn the cabinet right side up.
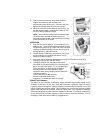
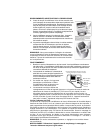
EVAPORATIVE WICK
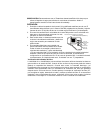
5. Replace the float assembly and attached lift rod into
the boxed area on the bottom of the inside of the
cabinet. Slip lift rod into retainer ring and twist to
secure. The lift rod should be able to freely move
up and down about 3/8”. The retainer ring should be
located between the two ribs on the lift rod.
6. Place the wick assembly back into the guides
provided in the bottom of the cabinet and the ribs along the sides.
7. Place the chassis unit onto the cabinet ensuring that the chassis seats correctly into
the front and back grooved edges.
IMPORTANT FILLING INFORMATION
8. Before filling the humidifier with water, be certain that the speed control switch is
turned off and the humidifier is unplugged. Fill the water reservoir with water to the
level indicated on the wick frame assembly and “Fill to Here” decal on the cabinet
side wall. Do not overfill. When first filled, the reservoir capacity is 6 gallons.
Dry air is drawn into
the humidifier though
the back and
moisturized as it
passes through the
evaporative wick. It
is then fanned out
into the room.
LEGEND:
1. Water reservoir
2. Chassis/power pack
(motor/fan assembly)
3. Evaporative wick
4. Dry air intake
5. Moist air output