


4
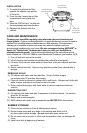
thermostat and hot air registers. Position humidifier next to an inside wall on a level
place at least 4 inches away from the wall or curtains.
ASSEMBLY
1) Unpack humidifier from carton.
2) Remove all packaging material, wicks, etc. from cabinet. REMOVE THE
PLASTIC WRAP FROM AROUND EACH WICK.
3) Place the wicks in position by sliding them into the mounting ribs molded into the
bottom of the cabinet.
4) Insert the plastic platform with the circular cutout (transitional molding) on top of
the mounted wicks. Note that the transitional molding is notched and marked
“FRONT” to indicate proper placement.
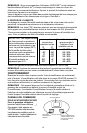
Replacement Parts Available For Purchase
Description Part Number
Chassis (Top portion of unit) 1B72700
Cabinet 1B71784
Transitional Molding 1B71786
Humidifier Wicks (2 Required) 1040
Air Purifying Filter (Optional) 1050
WATER FILL
CAUTION: Before filling, ensure unit is turned OFF and unplugged.
1) Before replacing the chassis, fill the cabinet with unsoftened water. DO NOT
POUR WATER OVER THE ELECTRICAL CHASSIS. Fill the cabinet only
through the opening between the wick and the cabinet sidewall. Note the MAX.
notation on the side wall of the cabinet. DO NOT OVERFILL. Cabinet capacity is
3.0 gallons.
NOTE: We recommend using AIRCARE
®
or Essick Air
®
Bacteriostat Treatment
when you refill the water reservoir to eliminate bacterial growth. Add bacteriostat
according to the instructions on the bottle.
Under no circumstances should you use Water Treatment products intended for
Rotobelt or Ultrasonic humidifiers.
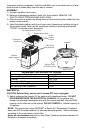
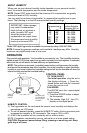
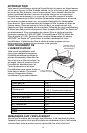
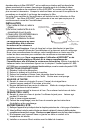
Cabinet/
Water reservoir
1040 Wicks
(2 required)
Air Intake Section of Grille
Air Exit
Section
of Grille
Digital Control Panel
BACK VIEW
Optional 1050
Air Purifiing Filter
Chassis
Transitional
Molding