


Installation
ASSEMBLY AND INSTALLATION OF INSERT SURROUND PANELS - FIREPLACE INSERT:
INSTALLATION AND REMOVAL OF CONTROL PANEL IN THE SURROUND PANEL - FIREPLACE INSERT:
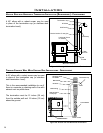
When installing the circuit board control panel into the surround panel, the surround does not need to be
assembled. The circuit board will be found in the firebox.
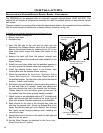
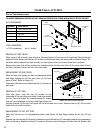
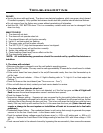
Place the circuit board control panel on the backside of the right
surround panel so the hinge is on the outside and the top and
bottom holes on the control panel line up with those on the
surround. Attach using two (2) T-20 screws through the front of the
surround into the circuit board control panel.
After the surround has been assembled and is ready to be installed
on the unit plug the wiring harness into the control panel (see
Figure 35).
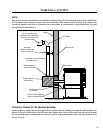
REMOVAL:
When maintenance is required on the unit the surround must be
removed. Pull the surround straight up till it stops then pull it out
about 4” (10 cm) and rest the surround on top of the unit while the
control panel is removed or disconnected.
If electrical connection is required for the maintenance remove the
circuit board control panel from the surround.
If electrical connection is not required for the maintenance remove
the wiring harness from the bottom of the circuit board control.
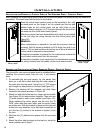
The trim set for your surround panel must be installed before
installing the surround panel onto the unit, if not already
done.
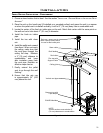
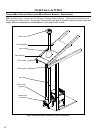
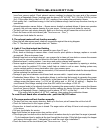
1. To assemble the surround panels, lay the panels face
down on a soft flat surface and align the outer edges of
the sides with the top panel. Using four (4) T-20 screws
up through the side panels into the top (see Figure 37).
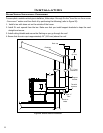
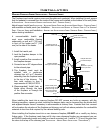
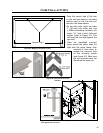
2. Remove the backing off the magnets and stick them
inside the trim pieces as shown in Figure 38.
3. Attach one side trim to the top trim, using a corner bracket
(see Figure 39) to secure pieces together. There are two
(2) main pieces to each corner bracket (see Figure 40).
When installing the corner pieces into the trim, the “B
FACE” sides must face each other and the screw heads
are to face out. With the bracket in place and the top and
a side trim snug together, use a flat head screwdriver to
turn the two (2) screws in the bracket to tighten it into
the trim.
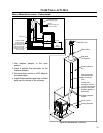
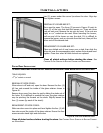
4. Slide the two (2) attached trim pieces onto the surround
panel.
5. Attach the other side trim piece to the top trim, using the
same method used in Step 3.
Figure 35: Right
Panel - Back.
Figure 36: Right
Panel - Front.
Figure 37: Assembled Surround Panel.
28