


27
Installation
PLATED TRIM INSTALLATION:
TO AVOID PERSONAL INJURY DO NOT REMOVE OR REPLACE TRIMS WHEN PELLET STOVE IS HOT!
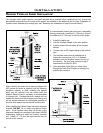
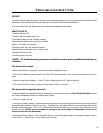
KIT COMPONENTS:
TOOLS REQUIRED:
●T20 screwdriver ●
11
/32” socket
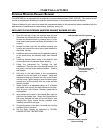
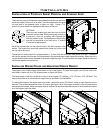
REMOVAL OF SIDE TRIMS:
When stove is off and cool, open the door. Remove the two screws on the right cab side (at top and bottom of front
ange) and the two screws on the left cab side (one above and one below hinge). The cab sides have hinges at the
back so they can swing open when the screws have been removed.
Remove the trims that will be replaced by unfastening
the #8 hex nuts (4 for each piece of trim) by hand.
Carefully remove the trim from the studs.
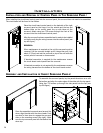
REPLACEMENT OF SIDE TRIMS:
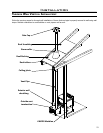
Place the new trim pieces on their corresponding
studs and nger tighten the #8 hex nuts (4 for each
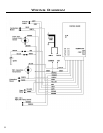
piece of trim). Refer to Figure 1.
Close both cab sides and replace the two screws on
each side.
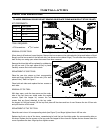
REMOVAL OF TOP TRIM:
With door open, undo the two screws on the under-
side of the top there are visible under the angled
corners. Open the hopper lid, remove the two
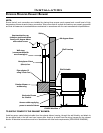
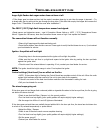
Top front with top trim
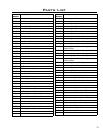
Quantity Description
2 Upper Cabinet Trim
2 Lower Cabinet Trim
1 Top Trim
3 Louver
4 #8 nut plated (spares)
screws that are found attached to the top under
the hopper lid. Pull top forward, lift the top front piece off the stove and turn it over. Remove the six #8 hex nuts
and pull the trim off the studs.
REPLACEMENT OF THE TOP TRIM:
Place the new trim on its’ corresponding studs (see Figure 2) and nger tighten the six #8 hex nuts.
Replace top front on top of the stove, remembering to hook the two front tabs under the corresponding tabs on
the stove. Replace the two screws on the top under the hopper lid then close lid. Replace the two screws under the
corner lips above the door. Align top then tighten screws.
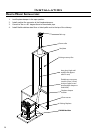
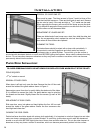
Right cab side with upper and lower cabinet trims.