


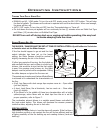

Routine Cleaning and Maintenance
The following list of components should be inspected and maintained routinely to ensure that the
appliance is operating at its optimum and giving you excellent heat value. The appliance, flue gas
connector and the chimney flue require regular cleaning. Check them for blockage prior to re-lighting
after a prolonged shut down period.
Check the Burn Pot Liner DAILY
Weekly Bi-annually or 2 Tons of Fuel
Burn Pot and Liner - Empty Exhaust Vent
Agitator Fresh Air Intake Tube
Heat Exchanger Tubes Blower Mechanisms
Door Glass Heat Exchanger Tubes
Ash Pan and Door Gaskets Behind Firebox Liners
Inside Firebox All Hinges
Door Latch Post Season Clean-up
Ash Box
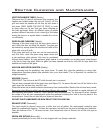
BURNER POT AND LINER (Checked Daily/Emptied Weekly)
This is the ‘pot’ where the pellets are burned. Only clean when the unit is cold.
Note: If, after long periods of burning, the fire continually builds up and overflows the burn pot or there
is a build up of clinkers, this is an indication that the pellet fuel quality is poor or the stove may need
cleaning. Check the stove for ash build up (clean if required) and adjust the slider / damper to produce
the proper clean combustion.
1. Open the door using the door handle located on the right-hand side of the stove.
2. Lift the lever on burn pot to unlock the fire grate and remove it.
3. The agitator locks at the right; rotate the top of the agitator towards the back of the firebox to unlock
it, slide it to the left, and lift it out of the burn pot liner.
4. Lift the burn pot liner out of the stove.
5. Lift the burn pot from the firebox by gently lifting it up at the front of the burn pot, then slide it out
from around the air intake tube and the ignitor cartridge. The ignitor is spring loaded to help with
removal and installation.
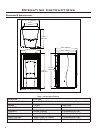
Burn Pot Liner
Ignitor (Spring
Loaded)
Air Intake
Tubes
Burn Pot
Fire Grate
Agitator
6. Remove any build up on the agitator (calcium build-ups are
common when burning corn). Using a metal scrapper, remove
material that has accumulated or is clogging the liner’s holes.
Then dispose of the scrapped ashes from the liner and from
inside the burn-pot.
7. Place the burn-pot back into the stove, there are hooks at the
front of the burn pot that sit in a mount in the firebox. Ensure
that the air intake tube and the ignitor cartridge. are properly
inserted into the burn pot.
8. Place the liner back into the burn-pot, making sure that the
ignitor hole in the liner is aligned with the ignitor tube; push
the liner up against the ignitor tube.
9. Slide the agitator back into place and turn rotate the top
towards the front of the stove to lock it in.
10. Set the fire grate in place, it should sit level on the front and
back of the burn pot liner. Lock it in with the lever on the burn
pot.
11. Close the door
Figure 8: Omega Burn Pot Assembly.
10
TOOLS REQUIRED TO CLEAN
UNIT:
Torx T-20 Screwdriver, ”,
5
/16” ”,
&
7
/16” wrench and/or socket, Brush,
Soft Cloth, and Vacuum with fine
filter bag