


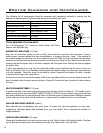

EXHAUST PASSAGES (semi-annually)
To prevent build up of fly-ash all the exhaust passages must be cleaned and vacuumed.
Routine Cleaning and Maintenance
If the glass has build up that can not be removed with only the cloth, clean the glass using paper towel
and a gas appliance glass cleaner, this may be purchased through most dealers. If a gas appliance glass
cleaner is not available, use a damp paper towel dipped in y ash to clean the glass. After the glass has
been cleaned use the dry soft cloth to wiping down the outside and inside of the glass.
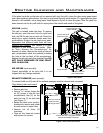
Vacuum inside ash
box compartment.
Heat exchanger tubes
cleaner handle.
Burn pot
clean-out lever.
Empty ash box.
Vacuum the top &
bottom air wash.
11
Figure 6: Bern Open
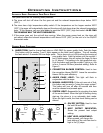
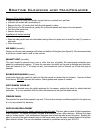
ASH PAN (weekly)
This part is located under the door. To remove
the ash pan, open the cover from the right hand
side, and lift the ash pan up and out. Dump the
ashes into a metal container stored away from
combustibles. Monitor the ash level every week.
Remember that different pellet fuels will have
different ash contents. Ash content is a good
indication of fuel efficiency and quality. Refer
to “SAFETY WARNINGS AND RECOMMENDATIONS” for
disposal of ashes. Vacuum the inside of the ash
pan compartment inside the pedestal including
the hole at the top back of the compartment.
Replace the ash pan and close pedestal door. DO
NOT PLACE UNBURNED OR RAW PELLET
FUEL IN ASH PAN.
AIR INTAKE (semi-annually)
Inspect periodically to be sure that it is not
clogged with any foreign materials.
Loosen the four (4) screws, rotate
counter-clockwise & remove.
Loosen the screw &
rotate the cover
(left & right sides)
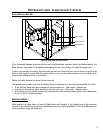
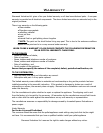
Clean behind clean-out covers:
• Open ash box cover.
• Remove ash box.
• Using a
5
/16” socket, loosen the
six (6) screws in the ash box
compartment; four (4) on the
back and one (1) on each side
(see Figure 7).
• Rotate the back cover counter-
clockwise to remove and rotate
the side covers to open them.
• Vacuum out all three (3)
chambers.
• Close all the clean-out covers
and tighten the screws.
Figure 7: Bern Clean-Out Covers.