


Page | 11
INSTALLATION
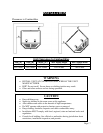
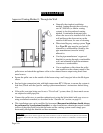
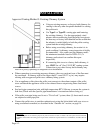
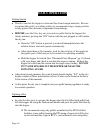
Approved Venting Method 2
: Through the Ceiling
• Venting through the ceiling/roof may be the only
feasible venting option in some cases and is a factory
recommended installation.
• When installing any venting system, Type L or Type
PL pipe must be used and all clearances to combustibles
listed by the pipe manufacturer must be strictly adhered
to.
• Use the pipe manufacturer’s approved ceiling support
for passing through a combustible ceiling, as well as the
required firestops, radiation shields, flashing and storm
collar.
• Be certain to follow the manufacturer’s required height
of termination above the roof line, and maintain at least
the minimum clearances to combustibles.
• Use an appliance collar where the pellet vent connects
to the exhaust output of the pellet stove and attach the
appliance collar to the exhaust blower output using three
sheet metal screws.
• Seal each pipe connection joint with high temperature
RTV Silicone, to ensure the system is leak free (Check
with the specific pipe manufacturer’s instructions before
doing so).
• If the pellet vent pipe being used is not a “Twist Lock” system, three (3) sheet metal screws
are required at each pipe joint.
• Connect the pellet stove to outside combustion air using the kit included with your stove or
using an alternative method, as described in the “Outside Air” section, on page 14.
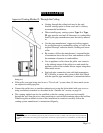
• This venting method can also be modified so that the venting system runs horizontally
through the wall from the stove, then transitions to vertical and terminates above the roofline.
When using this modified version of this installation be certain to carefully follow the
venting system manufacturer’s instructions diligently.
Please Note:
Installation diagrams are for reference purposes only and are not drawn to scale, nor meant to be used as plans for each individual
installation. Please follow all venting system requirements, maintain the required clearances to combustibles, and follow all local
codes.