


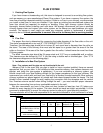


11
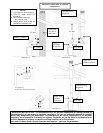
FREESTANDING PLACEMENT AND INSTALLATION
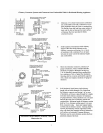
The first problem you may encounter is getting your stove into your home -- all of our stove
products are well constructed, which makes them rather heavy. Three to four adults can normally
handle a unit, but we still recommend using a handcart. Never attempt to handle a heating product
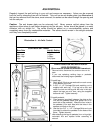
alone!!! The door and brick can be temporarily removed to lighten the unit (refer to Brick Layout).
After the unit is placed into position, install the spring handles and attach any optional equipment.
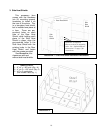
Chimney Connector Pipe
The black pipe must be six inches (6”) in diameter and at least 24 gauge steel pipe. Do not use
aluminum or galvanized steel pipe, as it will not withstand the extreme temperatures generated by
the stove. Also, do not use single wall connector pipe as a chimney -- you must connect your stove
to a chimney comparable to those listed earlier in this manual. The crimped end of your pipe
should be inserted into the flue collar and, by doing this, all the pipe will be reversed. If you use this
method the creosote will run back down the inside of your pipe and not out of the joints onto your
stove. As a safety precaution, all joints should be sealed with high temperature silicone (AC-RTV3)
and secured with sheet metal screws.
For proper operation the chimney connector should be as short as possible and never exceed a
six foot (6’) horizontal run. Horizontal runs of chimney connector pipe should have an upward slope
of one quarter of an inch (1/4”) per foot. You will need to maintain 10.5” of clearance from the wall
and 18.0” from the ceiling unless you are using double wall or shielded pipe.
Attach and secure the chimney connector to the stove with a minimum of three (3) sheet metal
screws, and also use a minimum of three (3) sheet metal screws to secure each adjoining section
of pipe.