


24820-1-0409 Page 39
GAS CONVERSION INSTRUCTIONS
Warning:Conversionmustbedonebyaqualiedservicetechnician.Mainburnerorices,frontburner
bushing, and gas conversion label are provided in conversion kit attached to manifold pipe.
CONVERSION INSTRUCTIONS FROM (LP) PROPANE GAS TO NATURAL GAS
1. Turn OFF gas supply and electrical power to replace.
2. Remove lower front panel.
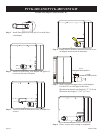
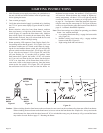
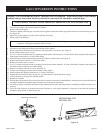
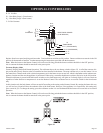
3. Unscrew regulator stem from gas valve and reverse regulator stem to the natural gas position and screw stem back into gas valve.
See Figure 44.
4. Open four (4) door latches in order to pivot open the front door.
5. Remove logs from replace.
Caution: Label all wires prior to disconnection when servicing controls. Wiring errors can cause improper and dangerous
operation. Verify proper operation after servicing.
6. Disconnect caps and plugs on ame sensor and hot surface ignitor.
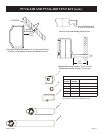
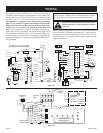
7. Remove log plate from interior of replace by removing twelve (12) screws. See Figure 56.
8. Remove front burner (one (1) screw).
9. Use 3/8” socket or wrench to remove propane gas front burner orice marked 1.10 from orice tting. Replace with natural gas
front burner orice marked 1.50 into orice tting.
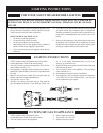
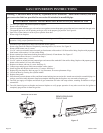
10. Insert natural gas front burner bushing into throat (Venturi) of front burner. See Figure 45.
11. Replace front burner with one (1) screw from Step 8.
12. Remove rear burner (one (1) screw).
13. Use 3/8” socket or wrench to remove propane gas rear burner orice marked 1.45 from orice tting. Replace with natural gas
rear burner orice marked 43 into orice tting.
14. Replace rear burner with one (1) screw from Step 12.
15. Connect caps and plugs on ame sensor and hot surface ignitor.
16. Install log plate into replace with twelve (12) screws from Step 7.
17. Replace logs into replace. Refer to page 18, Log Placement for correct placement of logs.
18. Close front door by securing four (4) door latches.
19. Replace lower panel.
20. Place Propane gas burner orice(s) into conversion kit. Attach conversion kit to manifold pipe. Attach gas conversion label adjacent
to replace nameplate indicating that the replace was converted to Natural gas.
21. Turn ON gas supply to replace and check all gas connections for leaks with soap solution, watching for bubbles on all gas con-
nections.
22. Turn ON electrical power to replace and turn on replace to verify proper operation. It may take several tries for ignition to
completely purge all the air from the gas line.
REGULATOR STEM
ADD BUSHING FOR
NATURAL GAS
Figure 44
Figure 45