


21759-6-0608 Page 45
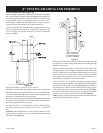
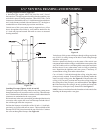
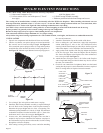
WARNING: Failure to position the parts in accordance
with this diagram or failure to use only parts specifically
approved with this appliance may result in property damage
or personal injury.
Attention: Do not use Figure 78 or Figure 79 to order logs. Refer
to parts view on page 63 and parts list on pages 64 and 65 to order
logs and/or ember material for your appropriate fireplace model.
Before you begin: If you are installing logs into the DVP42 or
DVP48 model then this fireplace is supplied with a set of three
ceramic fiber logs. Do not handle these logs with your bare hands.
Always wear gloves to prevent skin irritation from ceramic fibers.
After handling logs, wash your hands gently with soap and water
to remove any traces of fiber.
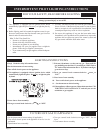
The positioning of logs is critical to safe and clean operation of
this fireplace. Sooting and other problems may result if the logs
are not properly and firmly positioned in the fireplace. Please
refer to Figure 77, Figure 78,
and Figure 79 and corresponding
WARNING, when completing the following log placement
steps.
1. Remove top louver, grasp louver, lift and pull forward.
2. Lower bottom louver, lift and hinge forward.
3. Release two glass frame spring clamps at bottom of firebox
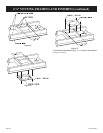
4. Place rear (#1) log onto two (2) pins on rear log support.
5. Place left, front (#2) log onto two (2) left, front pins on burner
pan.
6. Place right, front (#3) log onto two (2) right, front pins on
burner pan.
7. Place Branch (#4) onto one (1) pin on rear log
8. Place decorative rock in front of grates and sides of main
burner.
ATTENTION: Do not place decorative rock on logs or on
burner. The decorative rock should only be placed on the
fireplace floor.
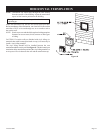
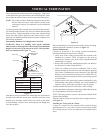
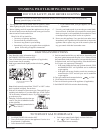
9. After all logs are properly positioned, place small "dime" size
pieces of Rockwool lightly across the front round "blueflame"
ports. Place the ember material (Rockwool pieces) side by side.
Do not stack more than one layer of embers across the burner
ports. See Figure 77.
10. Replace glass door onto firebox.
11. Secure the two glass frame spring clamps at bottom of
firebox.
12. Align the tabs on top louver brackets with slots in front posts
to secure top louver.
13. Close bottom louver. Lift slightly to engage the end tabs into
the slots in fireplace sides to close louver panel.
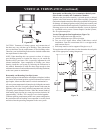
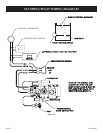
Figure 78
Figure 77
EMBER PLACEMENT
REAR
LOG LOCATOR TABS
BOTTOM LOG LOCATOR PINS
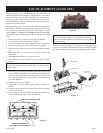
Figure 79
LOG PLACEMENT (4 LOG SET)
#4 - TOP BRANCH
#1 - REAR LOG
#3 - FRONT
RIGHT LOG
#2 - FRONT
LEFT LOG