


13118-7-0408 Page 15
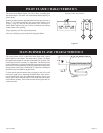
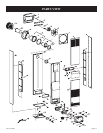
Replacing Fan and Oiling the Motor
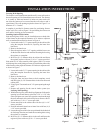
The fan motor should be cleaned and oiled once each heating season.
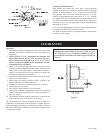
To reach the motor, withdraw the metal shroud surrounding the fan
blade by removing the screws on each side. Oil holes are located
on the top at each end of the motor. Use a few drops of #10 motor
oil. To clean the motor, blow air through its ventilation openings
with a vacuum cleaner or low pressure air source.
If fan motor is replaced, the silicone rubber gaskets, see Page 16,
Index No. 4, Part No. 712059, should also be replaced. The gaskets
must be stretched to fit the motor bolts into the gasket holes and then
the motor and gaskets installed on the motor mounting bars.
GENERAL : All furnaces have been fire-tested to check for
proper operation. This includes, main burner flame, pilot flame, fan
operation, fan control, limit control and automatic valve operation.
If the furnace fails to function on initial installation, it is advisable
to re-check the following:
1. 115 volts to the junction box.
2. Inlet gas pressure.
3. The 24 volt system.
4. Type of gas being used and that shown on the rating label.
The Service Department at Empire Comfort Systems, Inc. may
be contacted to assist in servicing furnace or call a qualified
serviceman..
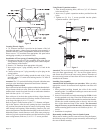
Servicing the Pilot and Main Burners, Pilot Orifice,
Thermocouple, and Main Burner Orifices: Disconnect the gas
supply at the inlet to the control valve. Then remove the burner
door to which the above components are attached.
Servicing The Fan Motor: The upper front panel, the shroud
surrounding the fan blade and fan blade must be removed. See
"Replacing Fan and Oiling the Motor" paragraph above.
Spark Igniter Does Not Light Pilot: With air in the gas line, such
as when the furnace is first installed or was off all summer, the
pilot flame may be too lean to ignite on the first few trials. Turn the
control valve knob to pilot position and depress the red reset button.
Holding the button down continually to bleed the line:
1. Use lighter rod to light pilot with a match.
2. Use the piezo ignitor at 30 second intervals until it lights.
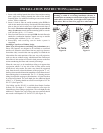
If Electrode Does Not Produce Spark:
1. Check wire connections.
2. Check gap for pilot burner to the electrode tip. Should be
between 1/8" and 3/16". Electrode wire and tip must be more
than 1/4" away from all other metal components.
If Pilot Does Not Light By Any Means:
1. Check valve knob for being in the "Pilot" position.
2. Check pilot adjustment for being full open (counterclockwise
to open).
3. If gas is available in the supply tubing, the pilot orifice and/or
pilot burner is probably restricted by a spider web. Clean
pilot assembly and relight.
If Pilot Does Not Remain On After Releasing Knob:
1. Follow instructions and hold button down longer and
harder.
2. Determine if pilot flame extends past thermocouple; if not,
adjust input or clean pilot burner.
3. Replace thermocouple if millivolts read less than 15
millivolts.
Pilot Outage During Normal Operation:
1. Check air inlet tube for a good tight fit at both ends (6"
diameter tube).
2. Check burner door and pilot hole cover for tight seal.
3. Check input by manifold pressure gauge or gas meter.
Main Gas Valve Does Not Open When Thermostat Is Turned
To On:
1. Check for 24 volts to valve by removing one wire and
touching to the SAME TERMINAL it was on. Terminal
should have a light spark. DO NOT SHORT ACROSS
TERMINALS, AS IT WILL BURN OUT THE WALL
THERMOSTAT.
2. Thermostat wires at the wall may be shorted, so check for
a faulty thermostat.
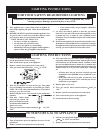
3. To check for line voltage to furnace, remove lower front
panel and switch compartment cover and short across two-
terminal fan control to allow fan to operate. (Figure 14)
SERVICE & MAINTENANCE SUGGESTIONS