


If you feel that you do not have enough electrical
wiring knowledge or experience, have your fan
installed by a licensed electrician.
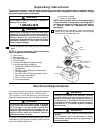
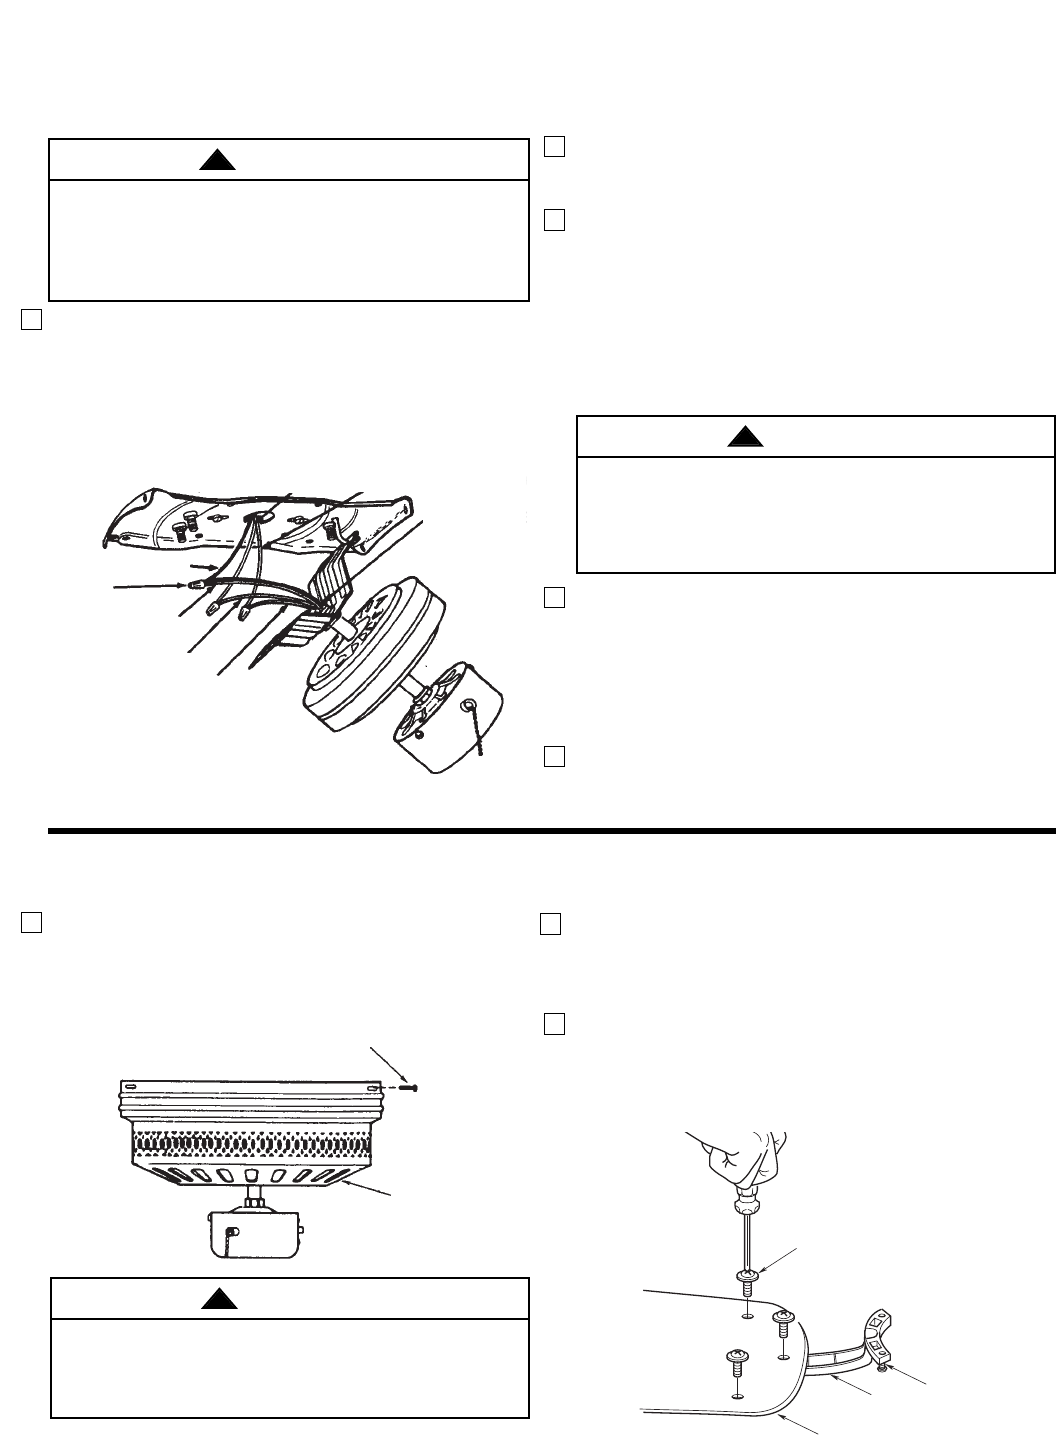
1. Connect the green grounding wires from the motor
bracket and the mounting plate to the grounding
conductor of supply (this may be a bare wire or wire
with green colored insulation). Securely connect
wires with wire connectors (supplied).
NOTE: If you are using an Emerson Light Fixture
with your fan, see the Light Fixture Owner’s
Manual for wiring.
2. Connect the fan motor white wire to the supply
white (neutral) wire using a supplied wire connector
(Figure 5).
3. Connect the fan motor black wire and blue wire to
the supply black (hot) wire using a supplied wire
connector (Figure 5). Your fan is now wired to be
turned on and off from the fan switch. After
connections have been made, turn leads upward
and carefully push leads into the outlet box, with
the white and green leads on one side of the outlet
box and the black and blue leads on the other side
of the outlet box.
4. Cut the 3-speed switch pull chain to a desired
length (optional). Connect the wood pendant
(supplied) to the 3-speed switch pull chain by
sliding the wooden pendant (small hole first) onto
the pull chain. Attach the chain coupler to the end
of the chain and allow the wooden pendant to fall
down over the coupling.
5. Return to step 4 of section "HOW TO HANG YOUR
CEILING FAN".
How To Wire Your Ceiling Fan
WHITE SUPPLY (NEUTRAL)
BLACK FAN WIRE
WHITE FAN WIRE
GREEN GROUND WIRE
BLUE FAN WIRE
WIRE
CONNECTORS
BLACK SUPPLY (HOT)
SUPPLY GROUNDING
CONDUCTOR WIRE
Figure 5
5
To avoid possible electrical shock, be sure electricity
is turned off at the main fuse box before wiring.
NOTE: If you are not sure if the outlet box is
grounded, contact a licensed electrician for advice,
as it must be grounded for safe operation.
WARNING
!
To avoid risk of fire or shock, check to see that all
connections are tight, including ground, and that no
bare wire is visible at the wire connectors, except for
the ground wire. Do not operate fan until blades are
in place. Noise and fan damage could result.
WARNING
!
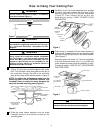
How To Put Your Ceiling Fan Together
1. Align the four holes in the fan housing with the four
holes in the mounting plate and install four
M5 X 10mm Phillips pan head screws with internal
tooth washers (supplied) (Figure 6).
2. Mount the blade flanges to the fan blades using
three M5 X 6mm Phillips washer head screws per
blade (supplied) (Figure 7). Repeat for four
remaining blades.
3. Attach one blade assembly to the motor using the
captive screws provided on each flange (Figure 8).
Make sure the screws are tightened securely.
Repeat this procedure for the other four blade
assemblies.
BLADE
FLANGE
FAN BLADE
M5 x 6mm PHILLIPS WASHER
HEAD SCREWS (3)
CAPTIVE SCREW
Figure 7
M5 x 10MM PHILLIPS PAN HEAD SCREWS
WITH INTERNAL TOOTH WASHERS (4)
FAN HOUSING
Figure 6
To reduce the risk of personal injury, do not bend the
blade flange when installing the blade flanges,
balancing the blades or cleaning the fan. Do not
insert foreign objects in between rotating fan blades.
WARNING
!